Cosmic poo Cannon

Cosmic Poo Cannon - (c) Gerard Blacklock D7000 coupled with Tokina 11-16mm f2.8 @ 11mm- Aperture: f/3.3 and Shutter Speed: 60.7 seconds (151 shots) ISO: 400

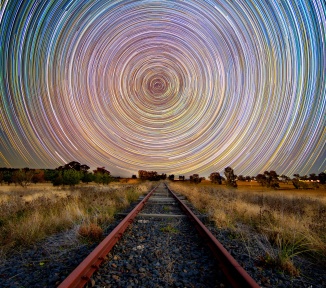
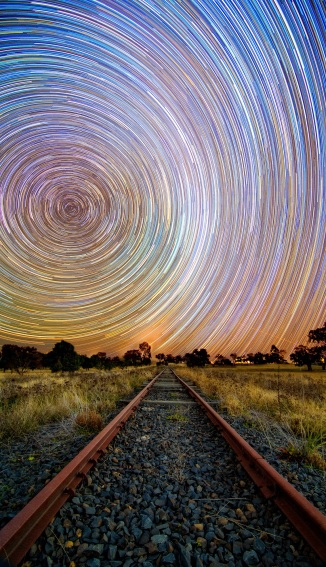
Cosmic Poo Cannon – (c) Gerard Blacklock
D7000 coupled with Tokina 11-16mm f2.8 @ 11mm- Aperture: f/3.3 and Shutter Speed: 60.7 seconds (151 shots)
ISO: 400

stand back, we have a new means for waste water treatment

The cosmic poo cannon, during daylight hours can be seen hereΒ https://blog.avernus.com.au/prelude/

Given the time of month and the lack of moonage, i was keen to get out and do some star trails, without having to drive a million miles to a dark place. After the failed attempt from the previous week with Rodney, I was itching even more so. I had planned to get out during the week but the fickle weather prevented it.

I have had a few potential sites in the back of my mind for while, Sydney park, Kurnell (multiple poo cannons there), malabar and North Bondi (super poo cannon), after looking at a few older shots of the super poo cannon (https://blog.avernus.com.au/prelude/) it really looked as if it had lots of potential, with the only unknown being (beside never actually having visited there) being the amount of ambient light that may spill from the adjacent apartments and streets.

After a wonderful sunrise at Coogee (Ross jones pool) with Rodney and half of Sydneys other photographers ;( I mentioned it could be on the cards if the weather was on – the rest is history.

So here we have – Cosmic poo cannon
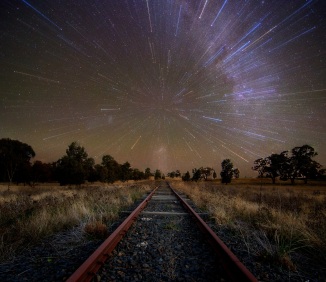
Taken in Australias largest city with probably some of the most light pollution around – just goes to show, you can do star trails pretty well anywhere πŸ™‚

Techie stuff
151 images stacked together using the statistics method in Adobe PS CC
The foreground shot was just a simply red LED torch applied to the path leading up to the poo cannon.
Opted for longer shutter to reduce the file numbers (read as running outta disk space)

D7000 coupled with Tokina 11-16mm f2.8 @ 11mm- Aperture: f/3.3 and Shutter Speed: 60.7 seconds (151 shots)
ISO: 400
out front – North Bondi Water Treatment plant Exhaust stack.

Lovely jubbly and thanks for looking – I welcome any suggestions, comments and improvements to my photography, they are always warmly welcomed and always appreciate the time people take to have a look and/or comment.

Bioluminescent ocean surf

Bioluminescent ocean surf - (c) Gerard Blacklock

D7000 coupled with Tokina 11-16mm f2.8 @11mm Aperture: f/3.3 and Shutter Speed: 329.5s
ISO: 200
Outfront – a hoodie, a big f-off drop and some funky-ass wave action.

So here we are, myself and Rodney perched out on some freaking rock outcropping atop a old munitions bunker trying to get a better view on the freaky stuff happening in the ocean, my first thought was a super aerated water being more reflective (and white) to light etc however it would have appear, to the naked eye and also to the camera sensor there was some bizarre means to which the ocean seem to emanate a glow when the waves shamed on the rock shelf.

I have seen images of the crazy ones in San Deigio but they are much more prominent. Clues anyone, surely we do not have Bioluminescent ocean here?!

Ironically, in less than 7 hours I was in a boat out in that very ocean doing some deep sea fishing, which btw was was pretty successful, got me some very tasty flathead and bream, real man sized fish πŸ™‚

Single shot
Exif/setup data:
D7000 coupled with Tokina 11-16mm f2.8 @11mm Aperture: f/3.3 and Shutter Speed: 329.5s
ISO: 200
Outfront – a hoodie, a big f-off drop and some funky-ass wave action.

Railway to the centre of the Galaxy

the next train is leaving platform earth in …

Following on from the previous night Star Trail session (https://plus.google.com/100975265940134223422/posts/7dfL8PdWNbg), this time I opted for more data, like any engineer, more data is never a bad thing – this set of trails was over the space of 5 or so hours and included the moon rising in the early morning.

Its very interesting to see how the AutoWB deals with the scene as the light changes over the night, over the 5 hours there was about 4 really significant changes in the white balance, all which would have been easily sorted out if I had set a fixed WB. In the end it actually makes little or no difference to the actual trail set since alot of that data actually gets cancelled out.

Techie stuff
331 images stacked together using the statistics method in Adobe PS CC and yep it takes awhile
This time I shuffled the foreground shot to get things to line up and fullfill the iniital vision of the tracks leading right into the tip of the galaxy. This time I changed the shutter to a bit long 55 or so seconds, really this makes little difference but just meant things ended up pretty bright, I actually had to darken the sky considerably to get the trails to stand out the way I wanted.

D7000 coupled with Tokina 11-16mm f2.8 @ 11mm- Aperture: f/2.8 and Shutter Speed: 55.6 seconds (331 shots)
ISO: 3200
out front – long metal things commonly referred to as railway tracks.

Lovely jubbly and thanks for looking – I welcome any suggestions, comments and improvements to my photography, they are always warmly welcomed and always appreciate the time people take to have a look, plus and/or comment.

Cosmic Rays

Light speed down the railroad πŸ˜‰

I always wanted to try this technique, its pretty simple, just zoom the lens whilst the shutter is open – a couple of tips, which i will use next time (i learnt the hard way) to hopefully improve it.

– carefully zoom so not to move the camera/lens, otherwise you get non-straight zooming stars πŸ™‚
– time the zoom sequence to fill up the shutter speed, also try starting slow and speeding up to create a ramp down effect.
– slightly defocus the lens to get more prominent zoomage

you basically need 3 shots for this , one with the zooming star trails, one for the foreground and one for the sky (under the zoomage), simply stack and mask out the zoomage where it kits the foreground, otherwise it looks like gamma rays.. you know the ones that past thru everything…or is that alpha rays? anyway, you get the idea.

3 shots
D7000 coupled with Tokina 11-16mm f2.8 @ 11mm

Shot 1 (foreground, twilight ) Aperture: f/9.5 and Shutter Speed: 1/3 seconds
ISO: 100
Shot 2 (background) Aperture: f/2.8 and Shutter Speed: 45.5 seconds
ISO: 3200
Shot 3 (zoomage) Aperture: f/2.8 and Shutter Speed: 45.5 seconds
ISO: 3200 with lens zooming

Lovely jubbly and thanks for looking – I welcome any suggestions, comments and improvements to my photography, they are always warmly welcomed and always appreciate the time people take to have a look, plus and/or comment.

Cosmic Railway

Its a dizzy ride to the centre of the galaxy

I learnt a few lessons from the last star trail session at the sandy side of Anna Bay, firstly.. go somewhere where there is no sand, tick. secondly set the timer correctly, tick
(note the malfunction from last time was actually due to the fact that I set the camera mode to single shot, this meant I missed an interval every shot and hence the 40 second gap between shots in my last one. It needs to be set to continuous low or high.
I still have a slight gap in the extreme view of the frame, but still better than the other attempt.

So with those key points addressed – for the next star trail session I think i need the following.. warmer location :), set the white balance to something consistent πŸ˜‰ and take care of local wildlife or farm animals πŸ˜‰ There was a cow terrorising this railway the following morning πŸ™‚

This was a set of images from a fairly short time period, just over 2 hours, I do have another set at over 5 hours, however the moon rose within that period and there was some pretty funky autoWB changes throughout that set, thats for a rainy day processing session!

techie stuff
192 images stacked together using the statistics method in Adobe PS CC
(see here https://plus.google.com/100975265940134223422/posts/VnN5muFSypj)
The foreground image included a bit more on the bottom which gave me the ability to get a slight vertical pano shot happening.

D7000 coupled with Tokina 11-16mm f2.8 @ 11mm- Aperture: f/2.8 and Shutter Speed: 45.5 seconds
ISO: 3200
out front – long metal things commonly referred to as railway tracks.

Lovely jubbly and thanks for looking – I welcome any suggestions, comments and improvements to my photography, they are always warmly welcomed and always appreciate the time people take to have a look, plus and/or comment.

The Stuttering Trail

don't stare into the vortex
Damn I hate equipment malfunctions, well it was probably a operator error, however it does feell better to blame it on the equipment…on the topic on things that crap me off, writing a post on gplus and to only have it disappear by pressing the backspace button a few times or something, very irritating, you would think that google in therr wisdom (like in gmail or docs) would have an auto save function when writing a 21 billion word post, cause it gets a bit annoying having to rewrite it… πŸ˜‰ oh also while I am at it, how about a input box that your can resize ? its like typing on your mobile phone when your actually in front of a bazillion inch screen lol.
rant end.

Star Trails are actually pretty easy to create, simply find a nice dark spot out on a moonless night and plonk ya camera down on a tripod. Point it somewhere in the vicinity of south and take a few shots every now and then, best to leave it and come back a few hours later, or better still come back the next and hope your camera is still there and some clown has not pinched it πŸ˜‰

Adobe PS CC makes it pretty easy to create the image from the 14.5 billion images you took while the camera was sitting out waiting to be stolen, CC now has the Statistics function built in, simply load your images up in file>scripts>statistics and using the maximum option zap them together for some trail fun.
Alternatively just use the load files into stack option and zap(blend) them together using the lighten mode, don't forget to whack in your nice foreground shot.

The foregound shot can simply be a shot taken at dusk to get the scene nicely illuminated or you can get you torch out for some funky light painting. But, and a big but, if you do light paint (and this is very important and error that many make) be sure to do it off the camera position (at least a dozen steps away) and get low, this will help create texture in the scene (see here https://plus.google.com/100975265940134223422/posts/d5z6TCzuzRj) and give your scene depth.

techie stuff
D7000 coupled with a pre sand filled Tokina 11-16mm f2.8 @ 11mm- Aperture: f/2.8 and Shutter Speed: 40 seconds
ISO: 1250
out front – absolutely nothing buts lots of wind and plenty of sand.
to the left – white coloured LED torch.

Lovely jubbly and thanks for looking – I welcome any suggestions, comments and improvements to my photography, they are always warmly welcomed and always appreciate the time people take to have a look, plus and/or comment.