Leofoto Panoramic Kit LEP-01
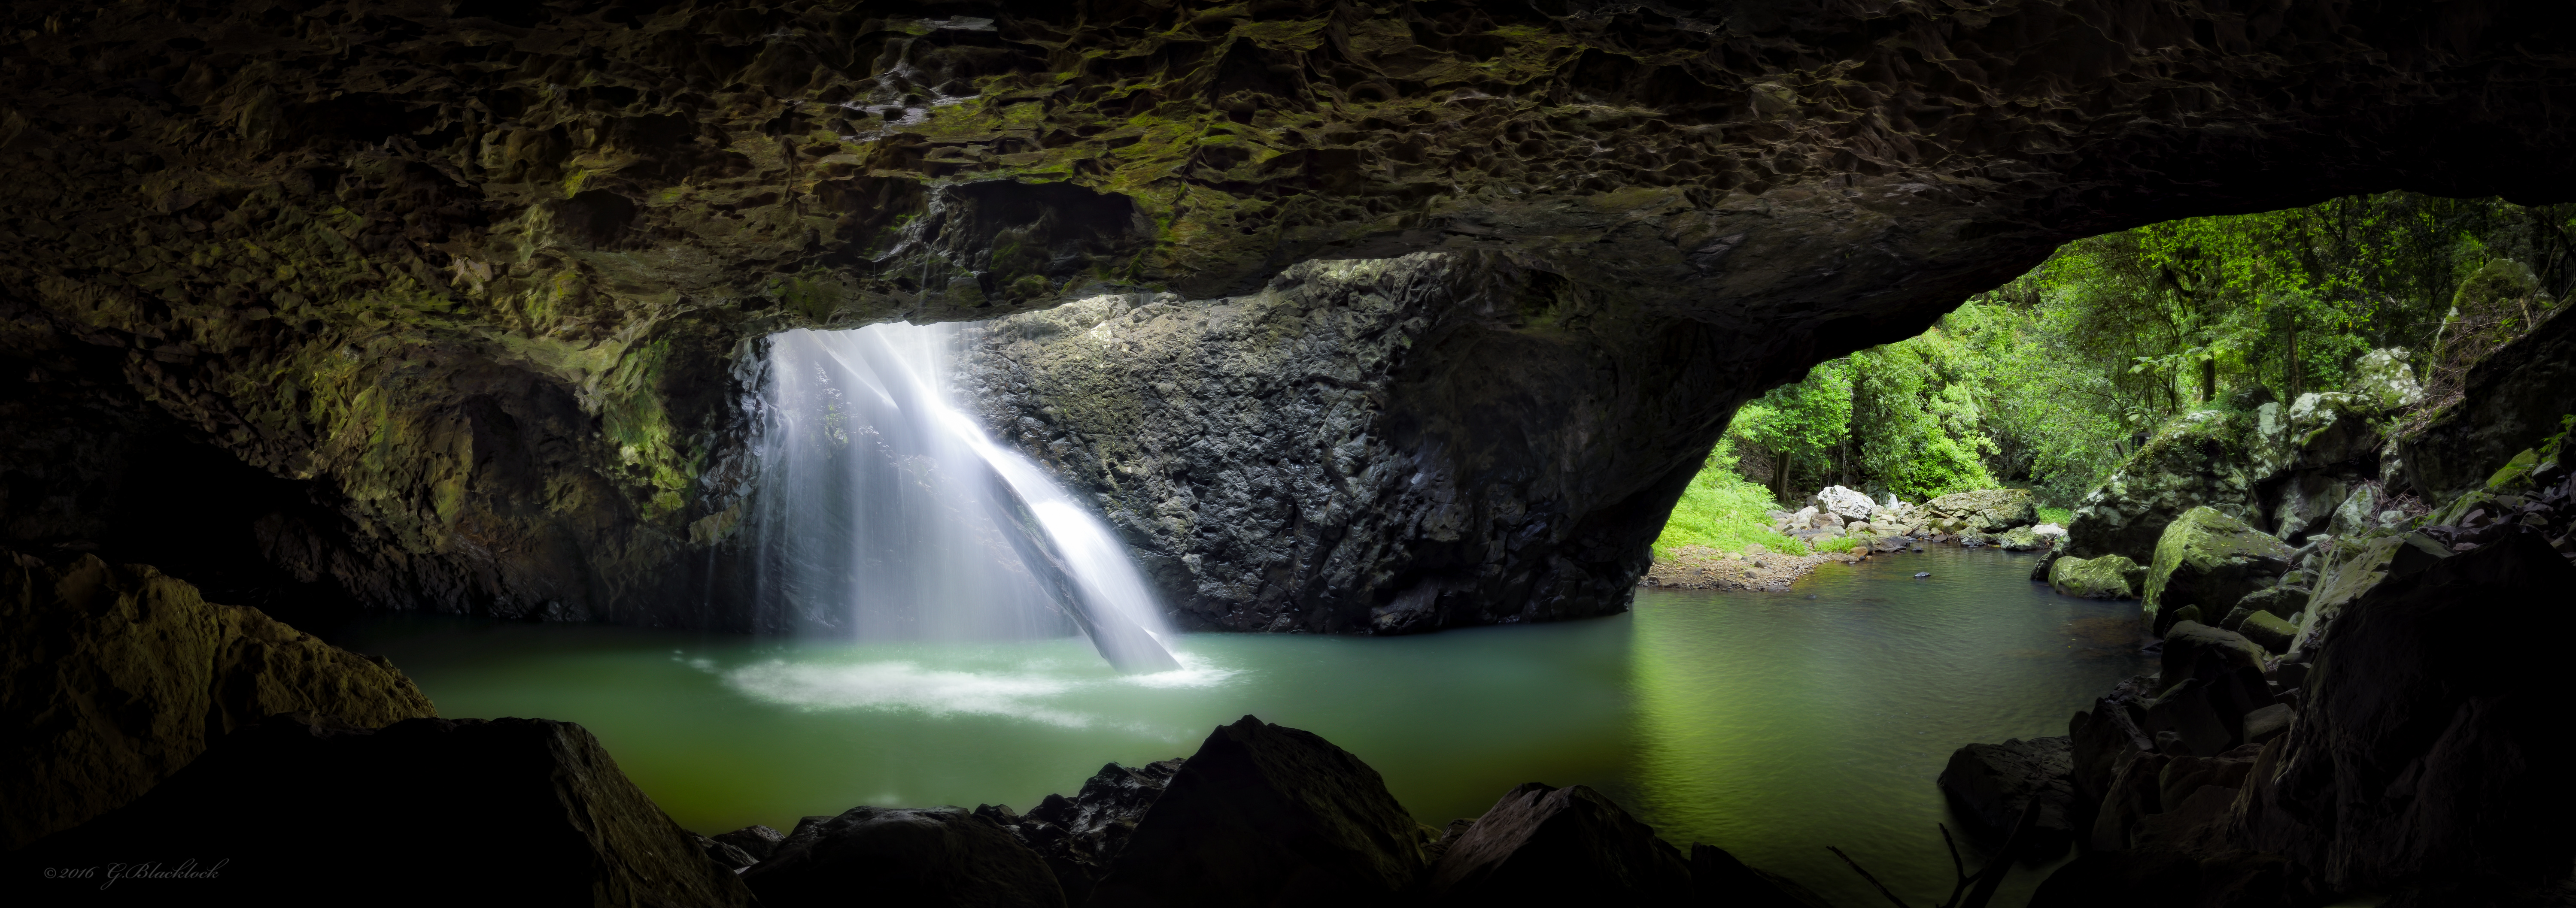
Natural Bridge, Springbrook National Park, QLD, Australia
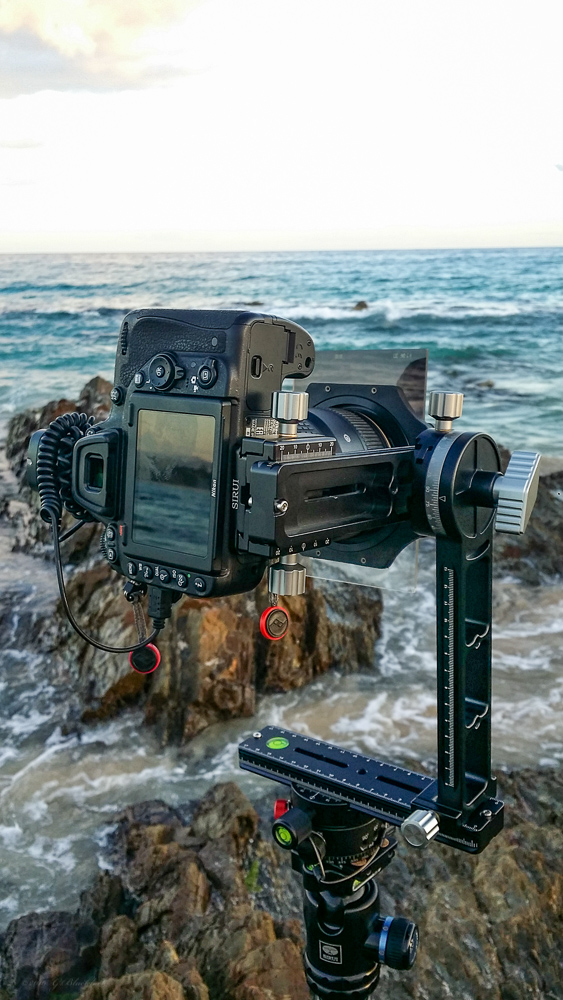
Leofoto LEP-01
D750 with Nikkor 17-35 f2.8 @ 26mm and Hoya Circular Polariser
Shutter speed: 1s (normal exp), 8s (over exposed) and 1/8s (under exposed)
Aperture: f/8
ISO 100
If you had asked me a few years back whether using a panoramic setup was worth the effort, the answer would have been pretty well no. However I have come to realise there are a few niche areas of photography which can only be done with a pano kit.I use that term, ‘can only be done’ pretty loosely, probably a more accurate way to put it is, ‘using a pano kit can really improve the ease, speed and post processing of panoramic images’. Its pretty amazing what post processing you can now do to wrangle and stitch images into a panoramic format and correct distortion, but the use of pano kit can in quite a few cases pay for it self in time savings alone. Not to mention those cases where no amount of magic stitching software will work, architecture for example or even landscape scenes with a mix of close and far objects and lots of straight lines, a panoramic image of a jetty comes to mind.
This is not so much a review, but more of a commentary on the Leofoto LEP-01 kit and panoramic imagery after using it for 3-4 weeks. What I find important and advantageous might not be what others find the same. Its also worth noting that I am coming to the Leofoto LEP-01 with the experience of using a few other brand of pano kits; namely Manfrotto and Novoflex.
I recently got hold of an older model Manfrotto pano kit, the 303Plus, which I have been using for a little under a year. It’s a pretty neat kit, which you could hang a elephant off. Consequently, it is quite awkward in shape and size as well as darn heavy; it could double as your boat anchor, if you know what I mean. This leads me to the first big advantage of the LEP-01 Leofoto Pano kit: it’s really light and compact. Even compared to a Novoflex Slim it’s pretty compact and quick to fold up and pack away, all tool-less of course.
My main use for panoramic kits is to do wide-angle panoramas of scenes which are close, and with items of varying distance from the camera. In this scenario, almost no level of post processing or stitching wizardry can get you the same result. At the moment I have a particular fondness for close up waterfall scenes shot in a wide panoramic view. I don’t typically use a panoramic kit for scenes where the focal length is greater than 70mm and there is little in the immediate foreground, these scenes are typically very easy to stitch without the camera being rotated around the nodal point. In these cases I simply rotate the camera on the tripod and that produces an acceptable result.
Centennial Glen, Blackheath, NSW, Australia (C) 2016 Gerard Blacklock, all rights reserved
With the Leofoto LEP-01
D750 coupled with Nikkor 24-70 f2.8 @ 28mm Aperture: f7.1 and Shutter Speed: 30s
ISO: 200
Out front: Circular Polariser
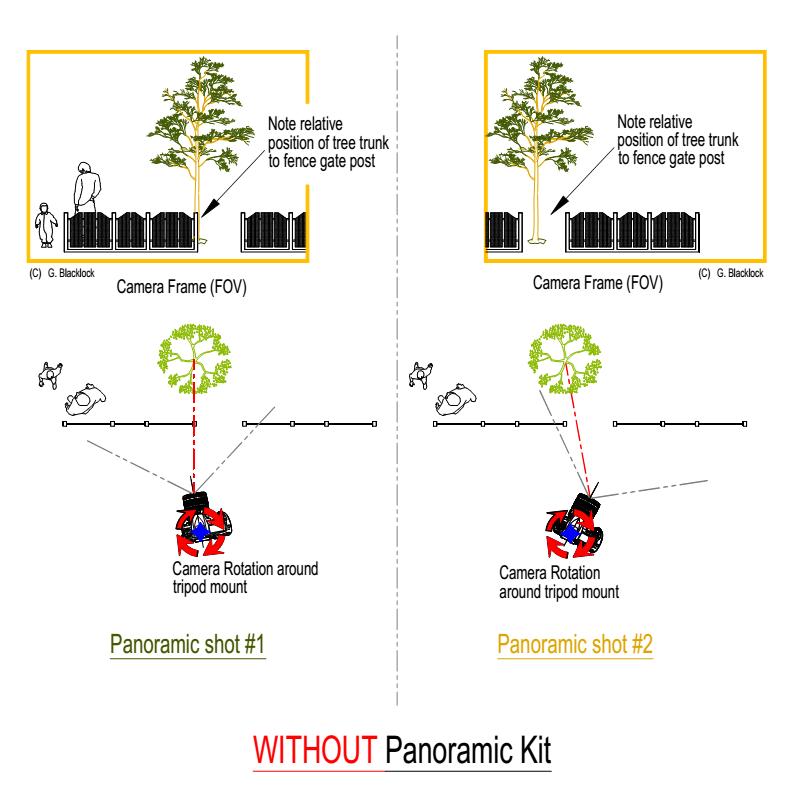
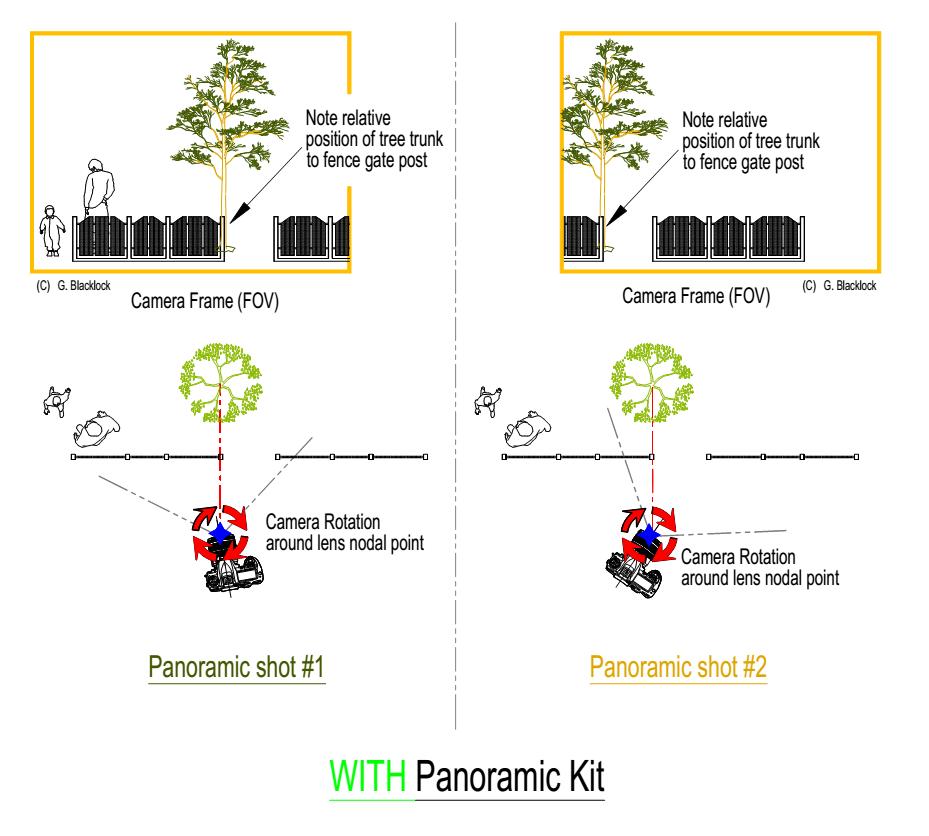
There are two basic concepts in panoramic photography which are both inter-related. The first is Parallax error, just Google and you will find a whole bunch of good explanations. Parrallax error essentially relates to the viewing of near and far objects, and the apparent different position of these items, this is where stitch errors can come from. The second concept is nodal point (hence where the name nodal rails comes from I suppose) or sometimes referred to as the no parallax point (NPP) – which does not sound as cool as nodal point so I will stick with nodal point. The nodal point is the point on the lens where you can rotate the camera and minimise, or completely remove any parallax error. Usually this point is just behind the lens front element, but it does vary from lens to lens.
Here is a visual representation, I do like my figures 🙂
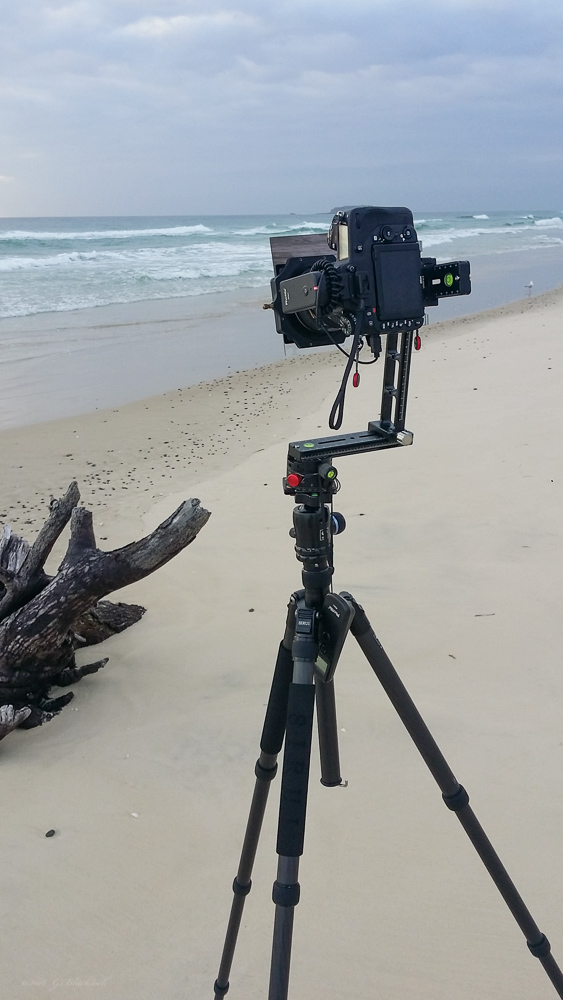
When I use panoramic kits I always attach a Arca-Swiss plate to the bottom (usually one needs need a 3/8” to 1/4” male to male adapter for the plate) to enable easy removal and attachment to the tripod. It does add another fitting and potential for a flex point, but I have not experienced any issues and it means you can more easily level the kit.
So the first thing that struck me when using the Leofoto LEP-01 was the weight and compactness. The ability to quickly pack it up into a reasonable size so that it fits in the bag means one thing; more use of the pano kit since it can be carried easily to locations. Otherwise you are stuck with what I like to refer to as car based photography spots. Basically where you are limited to rolling out of the car and walking a few hundred paces at best. In the recent trips and sessions where I used the Leofoto LEP-01 I could detach the vertical rail, swing the arm to be aligned and put that with the nodal rail and panning clamp into a spot in my bag that would normally fit my Nikkor 24-70 with the hood. This meant it got much more use than the Manfrotto 303Plus. The Novoflex Slim and the Pro II are also quite compact, and I would put the LEP-01 in the same basket as say the Novoflex Slim. However, there is a fairly significant price point difference there; particularly when the Leofoto LEP-01 is compared to the Novoflex Pro II.
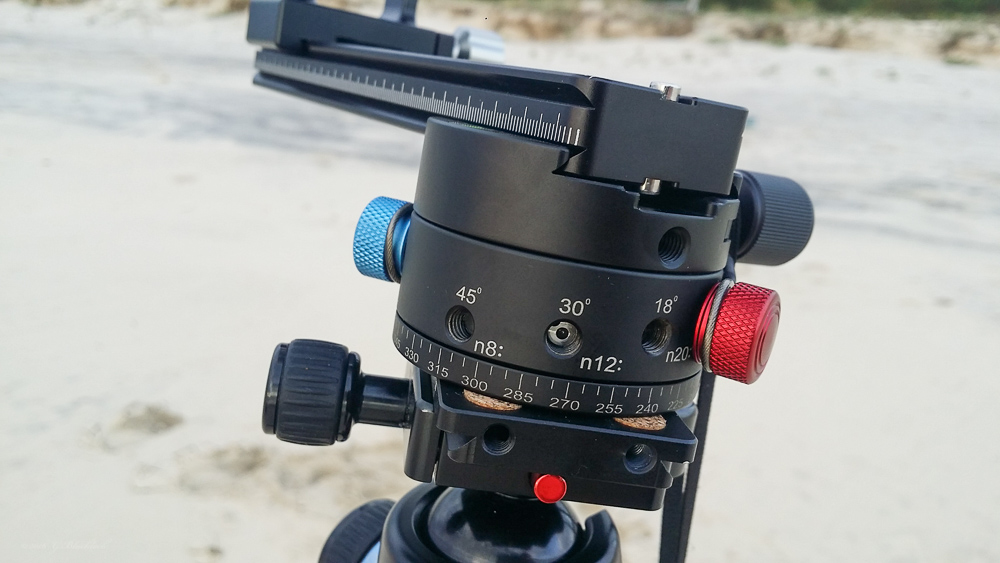
Weight is something that Leofoto has certainly considered here. The machined out pockets and the webbing on the rails has contributed to a light weight design without compromising stiffness. The rigidity between the nodal rail and the vertical rail is excellent which makes sense since it’s a standard Arca-Swiss style mount, it is also easy to remove. What had me surprised was the locking screw knobs, at first glance they seem to be a plastic kind of material, but upon closer inspection they are some kind of super light aluminium. I did wonder about the durability of these, however in the time I used the kit they performed well and did not show any signs of longevity issues.
Leofoto LEP Pano Head

Leofoto LEP Pano Head
Leofoto LEP Pano Head
Leofoto LEP Pano Head
Leofoto LEP Pano Head
Leofoto LEP Pano Head
The large winged knob on the vertical support is a good idea: coupled with the incremental indentations it makes locking off the spot for your pitch angle super easy and there was no indication of movement once locked off. I did try it with a couple of larger lens and it remained solid in all cases. The incremental indentations on the pitch angle control could however be improved, with finer increments. I had a case where I could not quite adjust it to the position I wanted when doing a vertical panorama. The incremental indentations are also quite pronounced, you need to release the winged knob considerably to change the pitch angle and I found myself thinking that a less pronounced indentation would make the adjustments quicker and easier, and consequently the vertical pano process a bit more refined.
The double sided release plate worked quite well and locks out perfectly. However, I often found myself unscrewing the wrong knob to slide it on the rail or remove the camera. I did quickly work out the best solution was to always put the camera release knob on the lower side to prevent this. Given that Leofoto anodize the Index Rotator increment knobs blue and red, I suggest simply having one knob a different colour would remove this minor issue altogether, in any case, it can be just something to get used too.
Like most kits, cameras, tripod etc. there are always a number of minor things which may annoy one person but not another and also things which you just live with, or have a system in place to mitigate. The Leofoto LEP-01 has a few of these minor issues. However there was one aspect, which left me with the thought that I would probably pass up on specific parts of this kit. Specifically the Index Rotator (DH-64) is one item I struggled with, I found the incremental adjustment screws cumbersome to use, I have the same style on the Manfrotto kit but with only a single screw, even with a single screw its a bit fiddly and a pain. However with the two adjustment screws on the LEP-01 caused me some level of frustration. I am not the kind of person how sits at home and tests out all the settings and gets the angle for every lens worked out, I quite often tweak and adjust the angle increments whilst in the field, especially when using a zoom lens. There are times like with a seascape shot where I will happily forego a 50% overlap to be able to quickly capture some water motion with only 30% overlap, hence the ability to quickly adjust the increment angle is paramount. The Novoflex systems are the best for this (that I have used), there is a single rotatable knob to change the increment, fast and easy, the pitch change one even has a neat little lever. Needless to say, having to adjust the two screw in knobs was a bit tiresome.
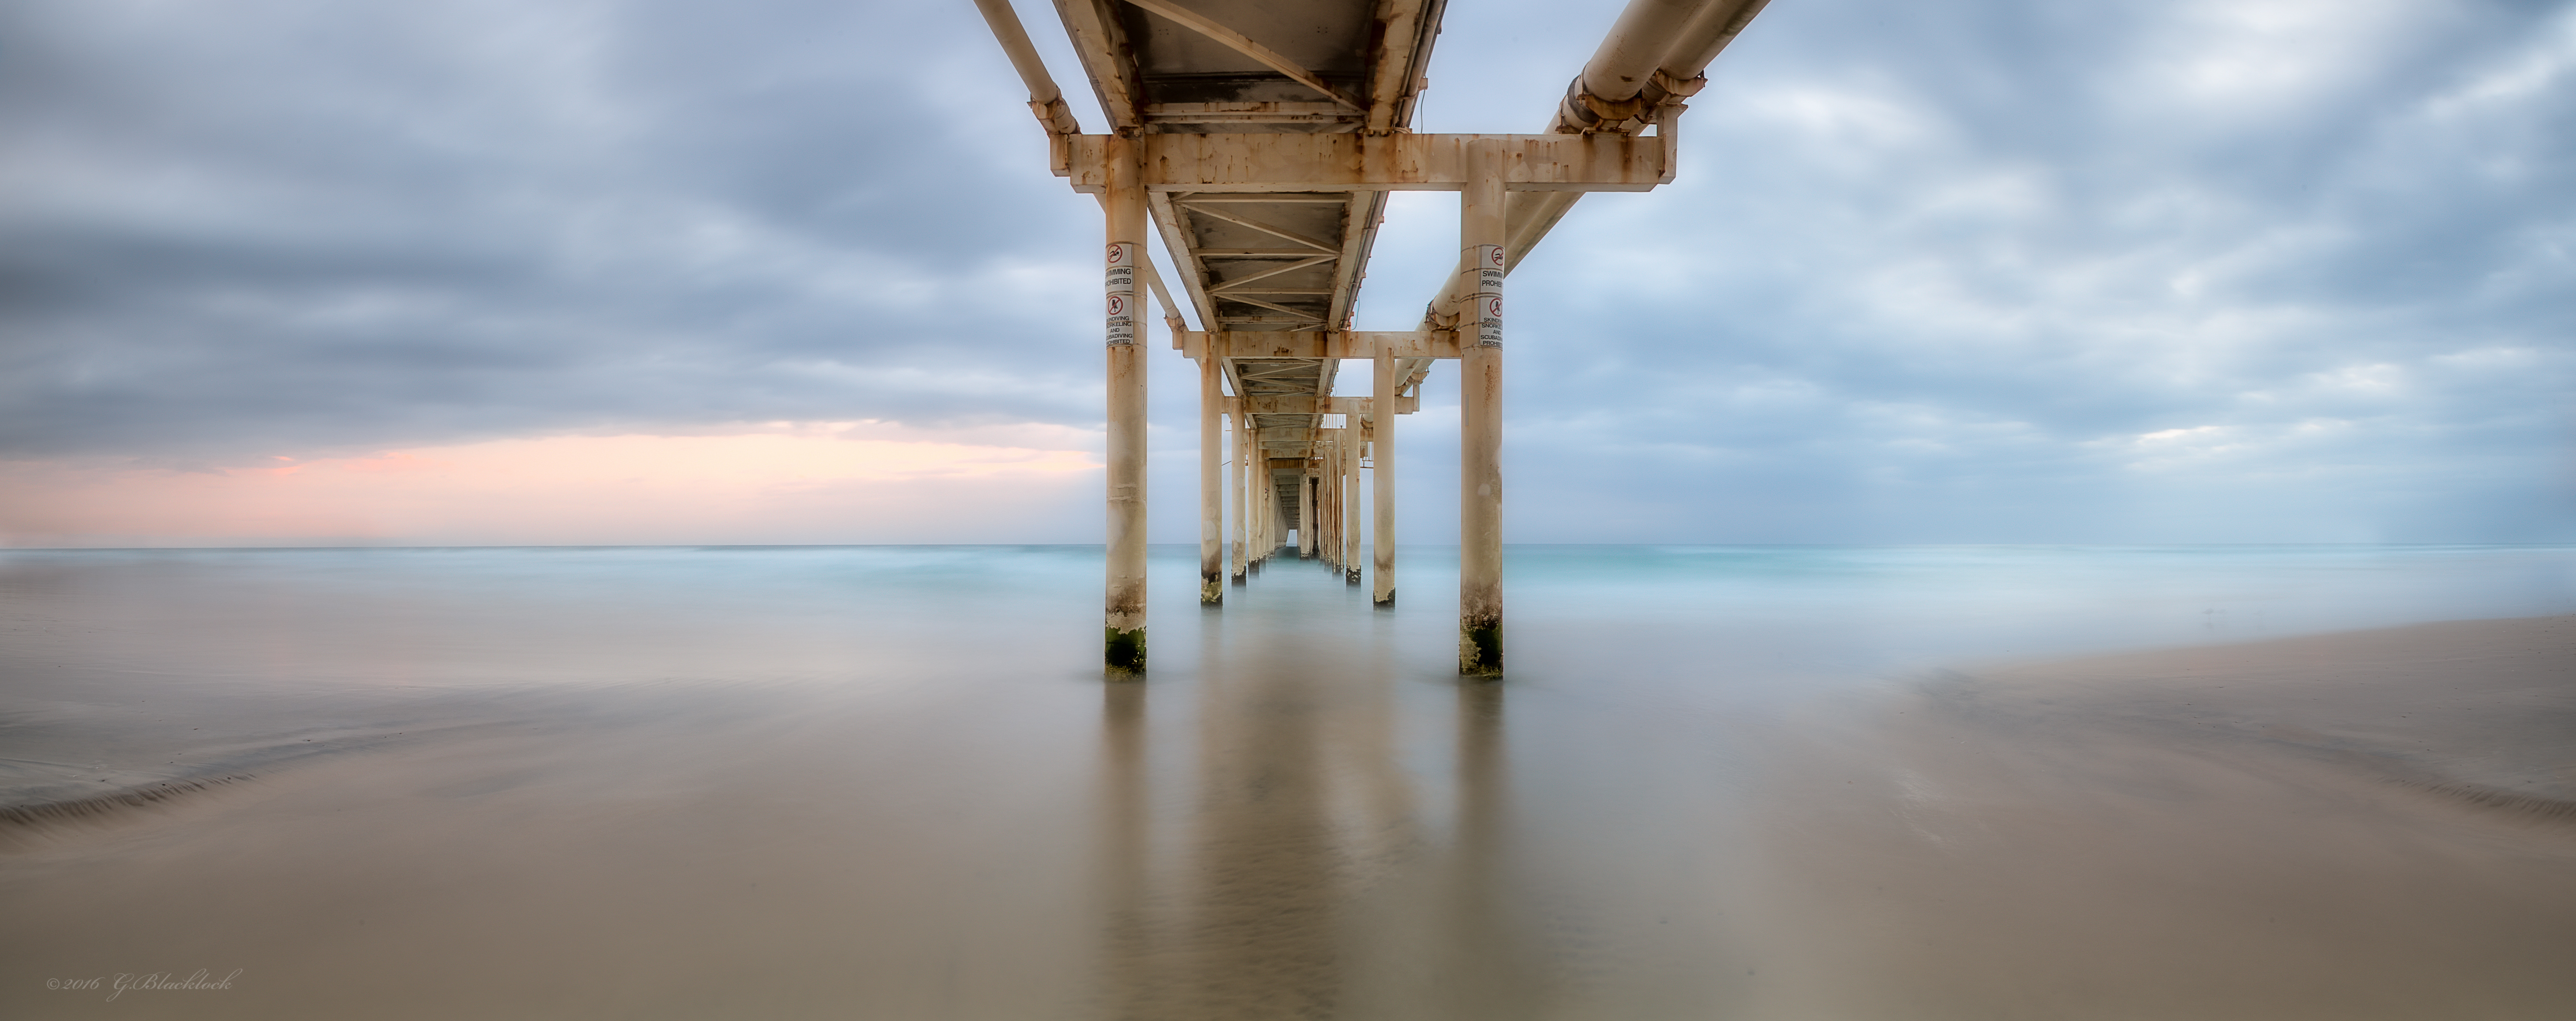
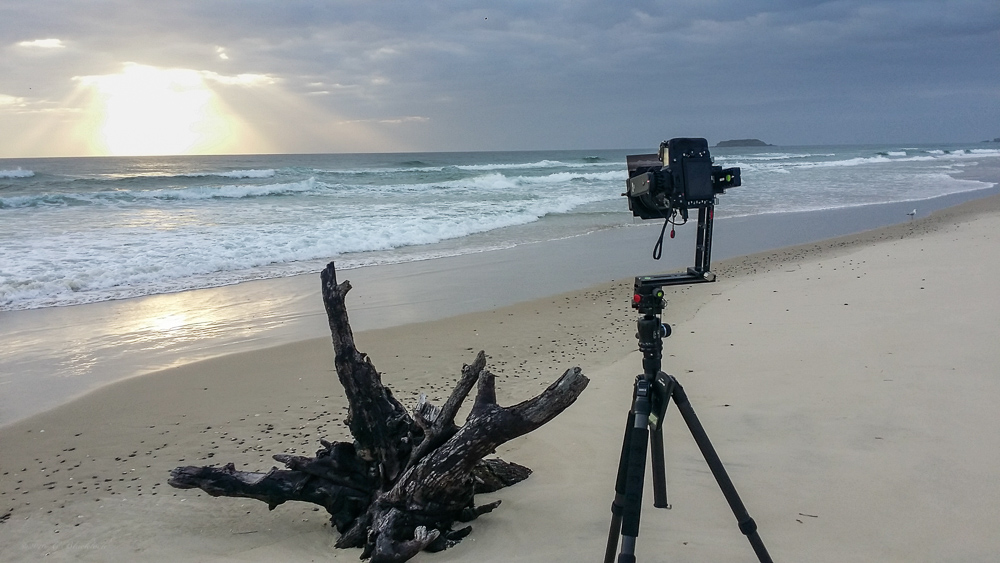
Fingal Head Sand Pumping Station, Fingal Head, NSW, Australia
(C) 2016 Gerard Blacklock, all rights reserved
With the Leofoto LEP-01
D750 coupled with Nikkor17-35 f2.8 @ 17mm Aperture: f16 and Shutter Speed: 20s
ISO: 100
Out front: Lee Graduated Filter (0.6x)
The Index Rotator (DH-64) is quite compact at a bit over 1.0” high (26mm for you metric folk). This was a pleasant surprise since it also adds to the compactness of the kit. The rigidity of this panning clamp (Index Rotator) was no so good. Now I must qualify that this could have just been a problem isolated to the sample I had. However, even with a light load on the pano kit there was quite a bit of free play (up – down direction) from the index rotator.I found I needed to level the kit out slightly offset to account for this play. The free play appears to come from between the two halves of the indexer in the up-down direction. This is not be acceptable to me. However, I reserve judgement knowing that it may have been just the copy I used. The indexer also has locking knob which I assume locks the rotation of the indexer, however in the copy I tried, this knob, no matter how tight I did it up, it did not lock the rotation. This is an aspect that is a deal breaker for me: I need to be able to carry the tripod and pano kit with the camera attached over short distances to reposition. The weight of the camera was enough to cause the whole kit to rotate whilst carried. Again, I do suspect this was just an issue with the copy I had, since this is a pretty essential basic function of any part that connects stuff to a tripod.

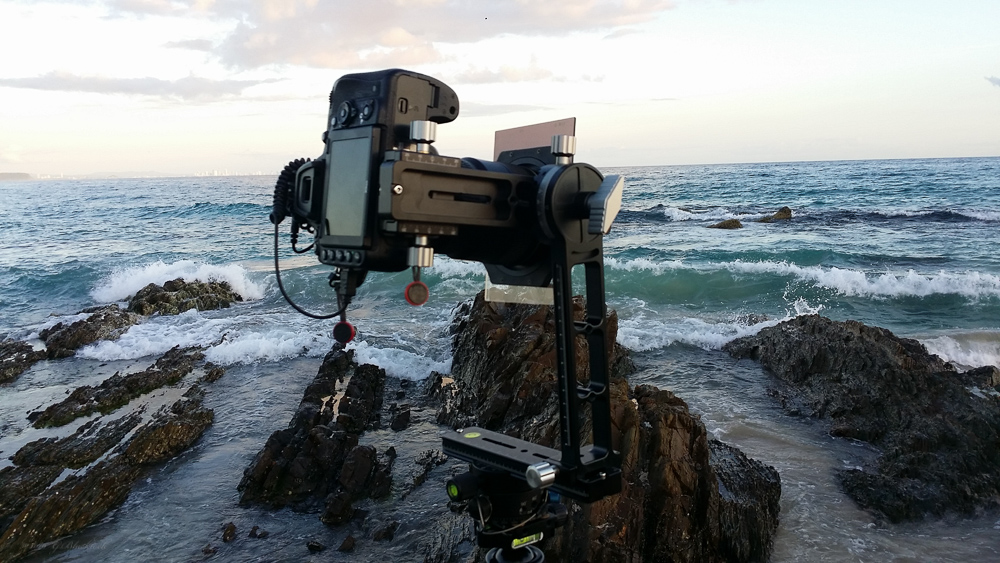
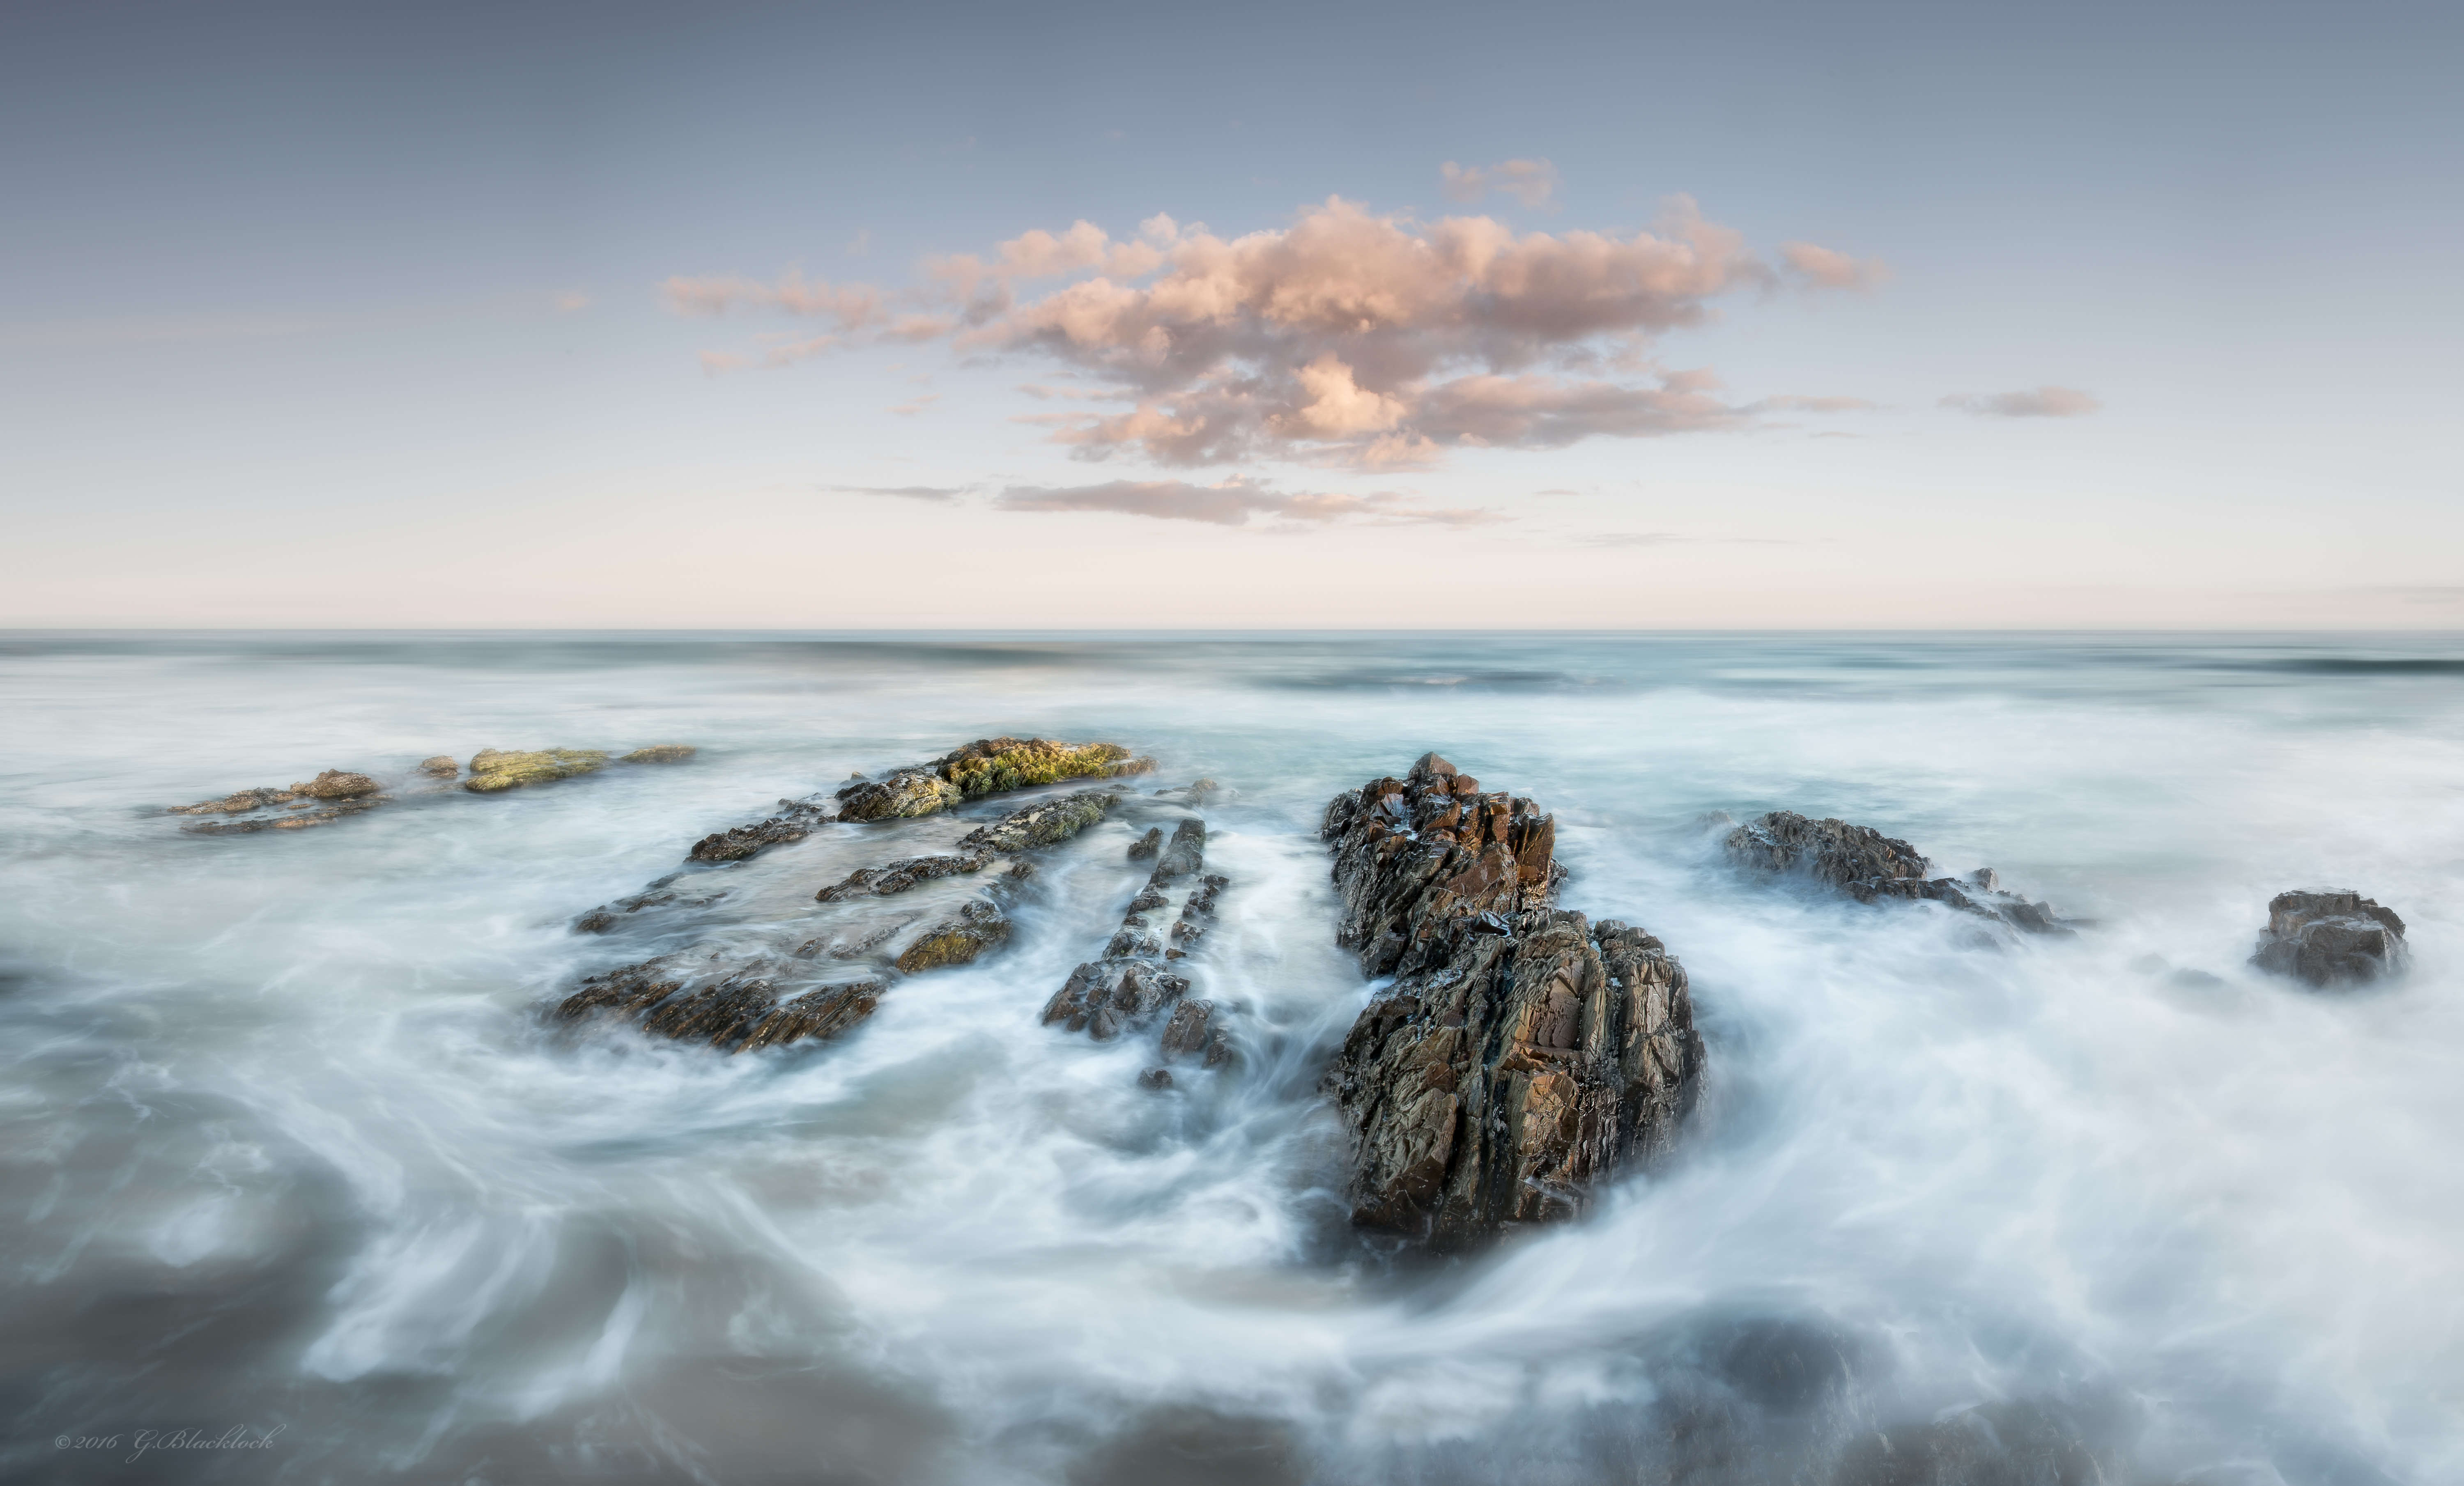
Fingal Head, QLD, Australia
12 frames
with Leofoto LEP-01
D750 coupled with Nikkor17-35 f2.8 @ 17mm Aperture: f18 and Shutter Speed: 1.6s
ISO: 100
Out front: Circular Polariser and Lee Graduated filter (0.9x)
This is one example where I had the indexer angle too small, I only needed about 4-5 frames and I needed them quickly to capture the correct wave positions, I did have a lot of trouble getting the waves to lineup as a result.
As a entry level panoramic kit for light DSLR’s and mirror-less systems I think the Leofoto LEP-01 is a pretty sweet kit, especially given the price point is typically ¼ of that of comparable systems on offer from Novoflex and Really Right Stuff. That said, whilst it’s not quite in the same league as the RRS and Novoflex, the quality of the nodal rails, vertical support and double quick release clamp is pretty darn good. I would be interested to see the offerings from the Leofoto Panorama -02 and -01 kits, however I suspect there is a increase in weight and size with these. You can also purchase all the individual components to really mix’n’match to suit requirements, an idea which I like. I do note though that the Leofoto catalog does not list some of the LEP-01 components.
Here is a quick summary of my pros and cons in order of priority:
Advantages:
-Lightweight
-Compact
-Cost effective
Disadvantages
-Indexer Rotator play – ie small amount of play in the swivel mechanism, which results in the nodal rails rocking.
-Indexer Rotator rotation cannot not be adequately locked out
-Increment selection on the Indexer Rotator is cumbersome
-Increment selection on the integral vertical panning clamp is too coarse, ie when performing vertical panoramas
Snapper Rocks, Coolangatta QLD, Australia
(C) 2016 Gerard Blacklock, all rights reserved
7 frames
with Leofoto LEP-01
D750 coupled with Nikkor17-35 f2.8 @ 17mm Aperture: f20 and Shutter Speed: 1.6s
ISO: 100 – Out front: Circular Polariser and Lee Graduated filter (0.9x)
This is a great example of needing to be able to punch out the frames quickly, the pano kit allows this speed so you can get all the frames within the same wave set – some of the best surf waves here too 😉
With a few minor refinements on the LEP-01 kit to address the above issues, primarily relating to the indexing rotator, it would certainly be a kit worth considering, particularly if you just starting out in the world of panoramic photography and need something which is cost effective, light weight and compact. I would happily whack this in my bag with a different index rotator on it. I appreciated it more after having to give it back and return to my ship anchor (aka the Manfrotto 303Plus!) I am definitely going look further into the Leofoto panoramic components.
Thanks a bundle to Cameron and the good folk at Kudos Cameras for letting me spend a few weeks playing with the LEP-01, noting that I am in no way financially affiliated with them or reimbursed for this, although I could probably get a beer or two out of it I reckon.
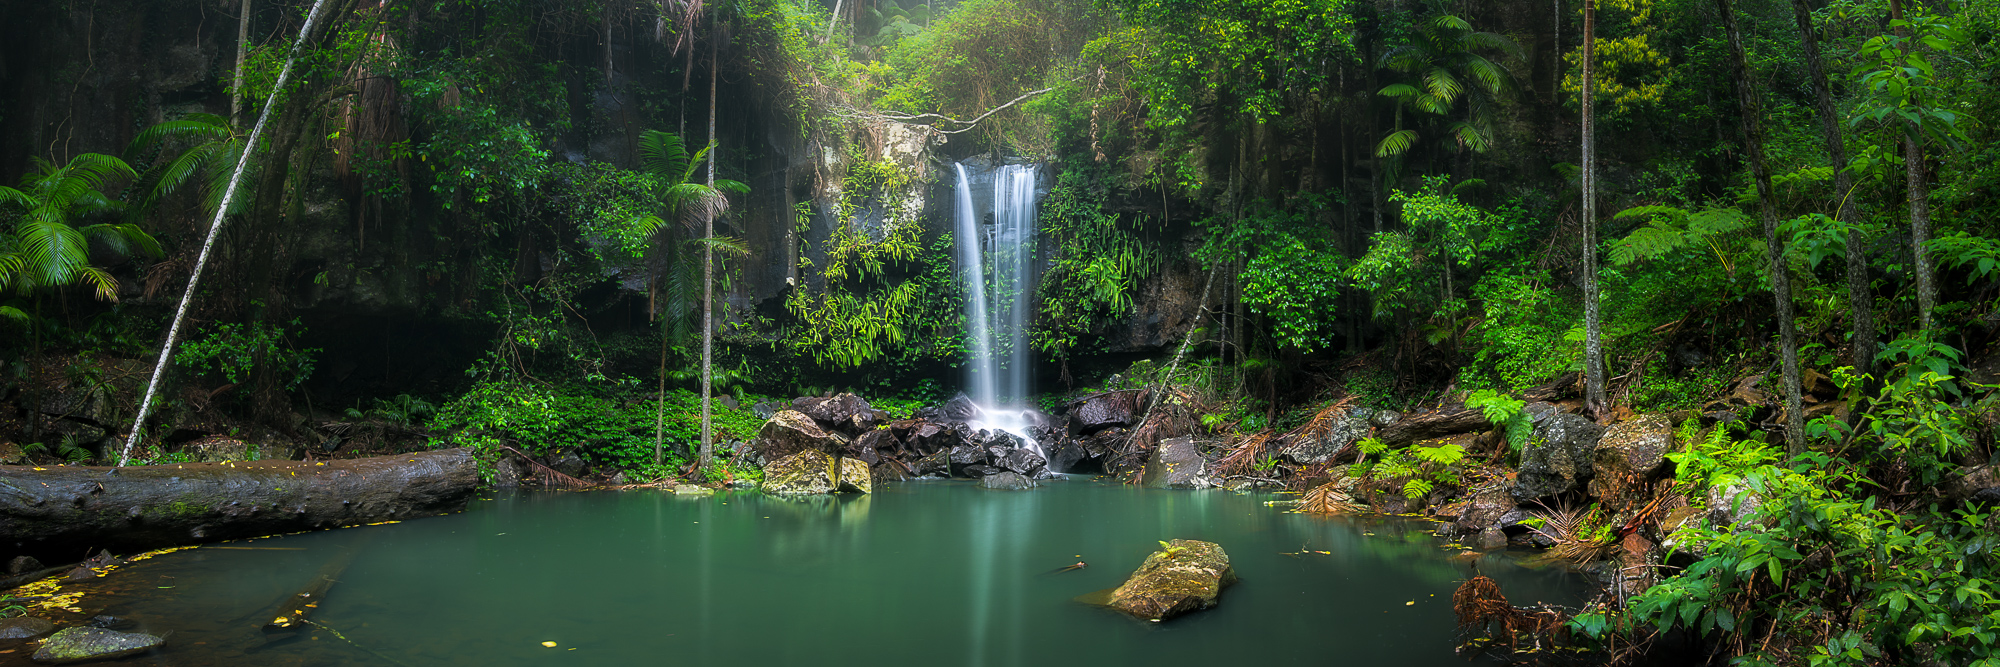
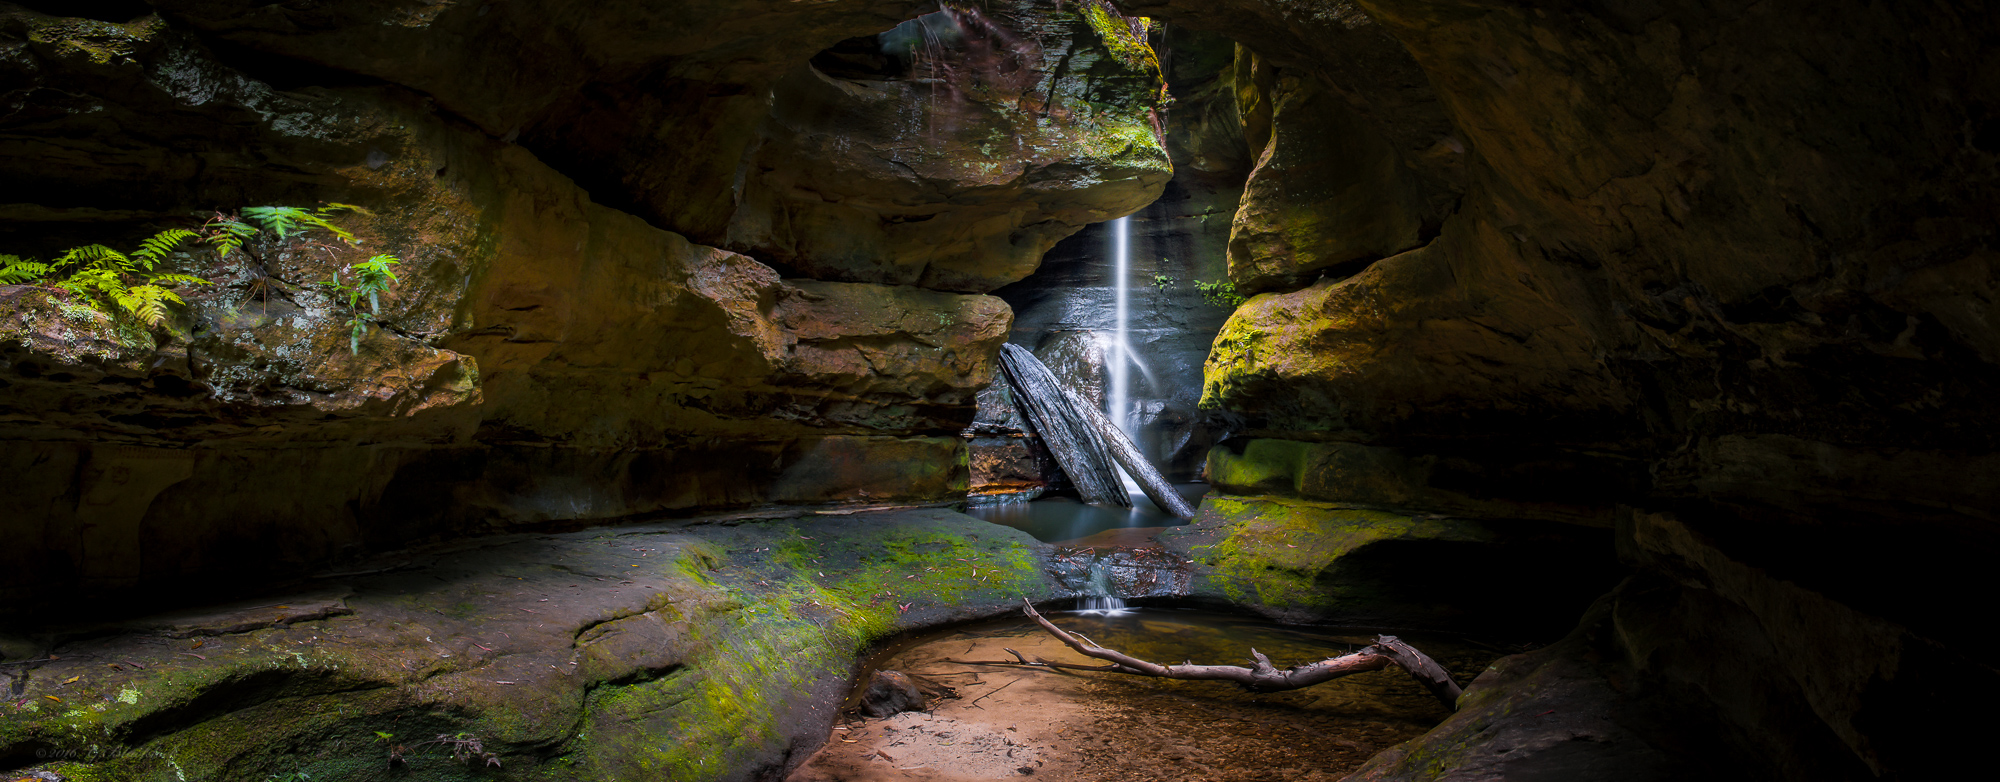
Curtis Falls, Mount Tambourine, QLD, Australia
(C) 2016 Gerard Blacklock, all rights reserved
with Leofot LEP-01
D750 coupled with Nikkor17-35 f2.8 @ 25mm Aperture: f18 and Shutter Speed: 4s
ISO: 100
Out front: Circular Polariser