Choose the path less traveled

Chhose the path less travelled - (c) Gerard Blacklock

Mount Wilson, NSW

I remember my mum saying, why would you want to visit there, there is barely native tree in sight 😉 or words to that effect anyway. My mum is a pretty staunch supporter of native trees etc.

So, queue Mount Wilson from the left, this place is like a colour explosion against the dull grey aussie bush backdrop – apparently as history has it.. the early settlers of the area were pretty wealthy people looking for a retreat location, they of course wanted a bit of home (England) and hence planted all the usual oaks and elms and stuff (thats my technical term ’cause i have no idea really:) ) and its pretty well stayed that way since then 😉 pretty wealthy people and lots of retreats :)…

But I suppose its now quite the tourist location and of course the much loved destination for many a photographer, from the smartphone wielding high heeled ladies to the tubby 200mm f2.8 bashing pros 🙂 that may be a little stereotypical but…

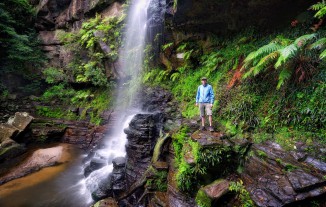
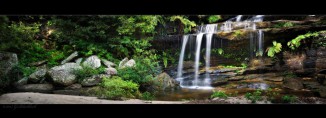
I am not overly convinced that this experience, for me, was worth the stupid oclock wake up and mind numbingly boring drive up and back (the apple pie and coffee at Bilpin was pretty nice though) but in the interest of actually producing a image, this is probably one of my favorites from the morning. The early start means you can stand on the road for quite some time snapping away before getting run over 🙂 In fairness though the colour has not fully developed here and the recent rain has smashed alot of the leaves from the tree and muted the colours a bit. I was just expecting to drive down and have my socks blown off by the wondrous colour 😉

So, you choose your path and go on, view it large 🙂

This is a 5 shot panorama, with each frame bracketed, to be honest the bracketing is a bit of a waste of time here, the extra effort required to process it outweighs the increased dynamic range for only a very small (insignificant part) of the image.

Exif love:

5 shot panorama,
D750 coupled with 24-70mm f2.8 @ 31mm Aperture: f/10 and Shutter Speed: 1.6s (normal exposure), 1/5s (highlights) and 13s (shadows)
ISO 100
out front – Hoya CPL

Hairy Falls

I would call it a waterfall, but its more like a trickle.

Waterfall Reserve at the end of Waterfall rd on the Waterfall loop walk, i suppose I better take a picture of the waterfall.

3 frames stitched together in +Adobe Photoshop
Exif love:
D750 coupled with 16-35mm f4 @ 29mm Aperture: f/14 and Shutter Speed: 25s
ISO 100
out front – Hoya CPL and lots of mud.

https://blog.avernus.com.au/hairy-falls/

Waterfall Cradle

Kellys Falls, number 2

The misty spray was just enough to be painful on keeping the filter clean but not enough give that misty look in the scene… 🙁

I love panoramic shots of waterfalls, they can add such a different perspective to a scene and to be honest, composition wise they are much easy than a single 6×4 frame 🙂

3 frames stitched together in +Adobe Photoshop
Exif love:
D750 coupled with 16-35mm f4 @ 24mm Aperture: f/14 and Shutter Speed: 5s
ISO 100
out front – Hoya CPL and lots of darn water drops

https://blog.avernus.com.au/waterfall-cradle/

Compete

When you turn up sunrise and its nearly an hour before the big S breaches the horizon, things can be a tad on the dark side, however, it is this time, also known as nautical sunrise, where you can get some stunning deep colour. Capturing it is easy, its getting all the stuff around it to be bright enough to even show up….

One solution is to take along a torch, which if you have any sense you would have cause its damn dark and you would stumbling around in the dark without one 🙂 anyway you can take this torch and provide a little artifical illumination, its a bit of trial and error but the results can be OK… mostly I have found it pretty hit and miss, and in this case.. well things got a bit too cooked, hence the title compete the artificial rock takes over the image and just about drowns out the for sunrise 🙂

Another point to make about using your torch to light paint, and I bang on about this all the time, is to make sure you use it nice and low to the ground to get some texture, but also more importantly choose where you want the light to come from – don't do what I did in this case and be lazy and just stand next to camera and halfheartedly wave it around 🙂 pick a spot well off to the side and give it a nice flow. Apply more light further away from the camera and less closer to the camera since the closer bit will light up much quicker.. you know light fall off as you get away from the camera.

Anyway, there you have it.. compete.

single frame, LED torch illuminating the rock fence from the right hand side, the other reason for the lazy man option was it was dark and I could not see much and.. there was some big potholes there .. anyways..thats the excuse I am sticking too 🙂

Exif love:
D750 coupled with 16-35mm f4 @ 16mm Aperture: f/13 and Shutter Speed: 97.8s
ISO 100
out front – Hoya CPL, Lee Graduated 0.9 Filter

https://blog.avernus.com.au/compete/

Coalcliff Creek

This little freshwater creek running into the ocean was in the process of excavating the dunes to straight line, it has been thwarted by some solid rocks which means it slides down a slippery 'S' into the incoming surf. This however, works in my advantage, the S curve creates some nice lines and just screams 'vertical pano' ok its probably a good chance I am the only one hearing that voice 😉

I had quite some time to really set this up and ensure it worked out, typically vertical panos using a wide angle lens (at 16mmm) without a proper pano rig can be a distortion nightmare.

I achieved two things with this shot, 1) the increased vertical FOV and 2) maintained depth of field thru the image, this was somewhat important since that rock in the foreground, the one in front of the one with the leaves on it is only 50 odd centimeters away, or 3ft for the imperial people. I was sitting on a rock just behind teh tripod which was at its lowest level.

I took 3 portrait orientation shots here, in each one the focus point was changed to ensure the maximum depth of field was achieved, the first image (bottom frame) focused on that rock with the leaves, the second image (middle frame) focused on the rock half up picture on the right and the final image (top frame) focused on the pool.

Exif love:
D750 coupled with 16-35mm f4 @ 16mm Aperture: f/18 and Shutter Speed: 30s (all shots)
ISO 100
out front – Hoya CPL and Lee Graduated 0.9x Filter

https://blog.avernus.com.au/coalcliff-creek/

The Devils Channel

darkness closes in as souls are sucked out…

I have sat on this image for some time, actually it's a series of images and in this case this is 4 portrait frames stitched together. I could not quite get the composition I wanted (at the time or in one frame) and include all the rocks so opted to take a series of shots and see how things looked after the fact.

I don't normally crop to square, however all other variations, portrait and landscape and pano just did not hit the spot.
What i did like though was the awesome colour in the low tide rocks and the slippery jet black rocks, seemingly enticing all to fall into the channel. I picked out a frame where the water flow was receding and from this angle looks like its getting sucked down a plug hole behind the rock 🙂

this channel sits just below Red Hill (named such since.. well you guessed it.. the dirt is very red 😉 ) which provides a great contrast to the bleak black rocks, but that's a image for another day.

4 images (portrait) stitched together as a pano then cropped to square.

Exif love:
D750 coupled with 16-35mm f4 @ 16mm Aperture: f/22 and Shutter Speed: 1.6s
ISO -0.7EV
out front – Hoya CPL and Lee Graduated 0.9x Filter

https://blog.avernus.com.au/the-devils-channel/

Another World

raking the zen garden

There is a whole different world that exists at low tide and as such it is why I love getting out when the tide recedes back. The low tide reveals rocks, seaweed, neptune necklaces and all other manner of sea crustaceans, and most importantly (well that could be debated but..) it reveals some different perspective and compositions for seascaping.

I had my trusty tripod spread eagle on adjacent rocks and i too was not far from it to minimise the amount of wet feet that i would have to endure on the long walk home. The sun was up but muted by the clouds blanking the horizon and as the waves gently rolled in and tracked down the S-curve of my composition I relaxed and watched some crabs cautiously peer out to see wtf this crazy human as doing 😉 Mornings like this are like raking a zen garden for me 🙂 and trust me, i have raked a few zen gardens in my time 🙂

2 shot blended image, one for the sky and one for the foreground.

Exif love:
D750 coupled with 16-35mm f4 @ 16mm Aperture: f/20 and Shutter Speed: 8s (foreground frame) 4s (sky frame)
ISO -0.7EV
out front – Hoya CPL and Lee Graduated 0.9x Filter

https://blog.avernus.com.au/another-world/

Bilgola Bank Busters

Bilgola Bank Busters - (c) Gerard Blacklock

D750 coupled with 16-35mm f4 @ 16mm Aperture: f/16 and Shutter Speed: 2s
ISO 100
out front – Hoya CPL, Lee Graduated 0.9 Filter

and not of the monetary kind 🙂

I really like the way the waves fanned out as the sun peaked over the horizon at 6:15am

Exif love:
D750 coupled with 16-35mm f4 @ 16mm Aperture: f/16 and Shutter Speed: 2s
ISO 100
out front – Hoya CPL, Lee Graduated 0.9 Filter

https://blog.avernus.com.au/bilgola-bank-busters/

Plateau

The Bilgola Shelf

Standing in water half way up my shins and with a third eye on the waves pounding the it was a fine balance between getting my ass wet and waiting for the right wave to come over the plateau. Its lucky I got long legs 😉 'cause there were a few grab the shorts moments.

Bilgola is a great little spot with some lovely cliff lines and interesting seascapes, whilst +Rodney Campbell and +Debbie Mooney worked on the Bilgola Pool, I slipped and slid over the shelf trying to line up the sky with the desired foreground 😉

I have hit this image for the initial impact, I loved the almost nuclear green seaweed in the channel and the moment the morning light moves from the warm crimson tones to catching some of the blue as the day really takes hold – and of course that water that flows over like alien tentacles.

Basically its 3 frame blended shot but there is a few tricks in there to get to the end result .. but thats all boring stuff, just show me the picture 😉

Exif love:
D750 coupled with 16-35mm f4 @ 16mm Aperture: f/16 and Shutter Speed: 6s (neutral) 1/2s (under) and 5s (for the water flow)
ISO 100
out front – Hoya CPL, Lee Graduated 0.9 Filter

https://blog.avernus.com.au/plateau/

Oxford Falls

underneath the radar

Sneaky Sunday session on the way home from sunrise 🙂 I have driven through this place called Oxford Falls a few times and never seen any creeks or falls, however I figured there must be some kind of falls for the place to get its name. I took a punt and went along a road with the same name thinking that would be the best bet and came across a satellite comm centre with some serious dishes out in the paddocks :), not to be deterred i kept going ..
Not much further down the road there was a creek, which I assume is Oxford creek, however the lack of any signage, or it was maybe my ability to actually notice said signage, and it was a matter of getting out and walking – after a little walk and I came across this gem of a falls, which is surely on my todo list after some substantial rain, the wide rocks and the watermarks indicates it could be really spectacular in the right conditions.

For now, I am happy with a few quite reconnaissance shots.

4 sets of bracketed images stitched together.
The bracketed set consisted of a normal exposure and a underexposure just to counteract the very bright high lights from the sun, particularly on the top right of the image.

Exif love:
D750 coupled with 24-70mm f2.8 @ 16mm Aperture: f/14 and Shutter Speed: 6s (normal exposure), 1.6s (highlights)
ISO 100
out front – Hoya CPL and Hoya ND (just to get a some extra shutter speed)

https://blog.avernus.com.au/oxford-falls/

Arranged

Upper Kellys Falls

I'll admit that I did arrange these leaves, I was looking for something a bit more in the foreground than just a flow of water, there was plenty of nicely coloured leaves here, particularly as we head into the throws of Autumn, which reminds me, I must visit the Blue Mountains for the Autumn colours, I have never really had a good look at them, anyway, thats for another day

So I collected a few of these leaves and +Rodney Campbell tracked down some others and I put them on the little bit of rock where the water was not rushing past. it does take some effort to arrange them such that is does not look…. well.. look arranged 😉

Exif love:
D750 coupled with 16-35mm f4 @ 16mm Aperture: f/18 and Shutter Speed: 6s
ISO 100
out front – Hoya CPL and some delicately arranged leaves 😉

https://blog.avernus.com.au/arranged/

Goanna Claws

So, apparently the story has it .. and bear with me here, this could get pretty loose 😉 and is about 10th hand (bit like chinese whispers!)…. there was a dude who called on the Goanna (Dirawong) to protect a bird, so the goanna chased the snake all around the lands of the Bundjalung, through Woodburn and towards Evanshead thus creating the river. Near Evanshead the snake bit the goanna on the head, the goanna then had to eat some herbs as a anti-venom ? note, that goanna's are actually immune to snake venom and often eat snakes (yay for the goanna) so this part of the story actually makes alot of sense.

Anyway, so then the snake turns around, which creates the little islands in the river (called snake island) after which the goanna then chases him out to sea. The goanna (Dirawong) now sits on the coast guarding against the snake and hence the name and shape of the headland (Diarwong / goanna head).

Thats gerry's abbreviated version 😉

So, this is all well and good, but me thinks that Goanna needs a wake up call since I seen waaayy too many snakes on that goanna headland 😉

Awesome history, i wonder why we get taught about stupid british british history rather than interesting stuff like that 😉 .. well it was the case when I went to school.

Exif love:
D750 coupled with 16-35mm f4 @ 16mm Aperture: f/18 and Shutter Speed: 1/1.6s
ISO 100
out front – Hoya CPL and Lee Graduated 0.9x Filter

https://blog.avernus.com.au/goanna-claws/

The Spirit of the Bundjalung People

Its interesting how alot of areas here in Oz have their own history, sadly there is a pretty common theme to this history and it involves the traditional owners of the land and their subsequent displacement, sometimes quite bloody. I recently did some research into this area to discover the culture and stories behind the land.

The local traditional owners of this land are known as the Bundjalung People, of which the National Park takes its name, in the middle of the 18th century there was a massacre of about 100 women and children in this area. It is said that you can still hear the sounds of the ghosts and see the lights of the firesticks on the river.

Whilst that's a pretty spooky thought (and i hope i never see it cause that would freak me out 🙁 plus i need to concentrate on not getting eaten by snakes, face slapped by spiders and not falling on my ass, all of which takes alot of concentration 🙂 ). Hence i think its better to see these spirits in the more beautiful and positive things that are around the area, like the wonderful seascapes, flora and fauna and in the case of this morning, the rainbow that lit up the morning from the point.

So, here's to you the Bundjalung People, and what its worth, I am sorry for the shit that was heaped on your people by the white settlers.

The rainbow was a full arc (faded in and out over the 10 minutes it was there), however I really like the way the foreground pool illuminated with the soft light and the glow in the clouds complimented the rainbow. It was a constant battle with the rain and wiping the filter, however I did finally get a few shots that i was happy with. This particular one is a stitched vertical panorama of 2 frames. I just needed that extra little bit of frame to give the pool and rainbow some breathing space.

Exif love:
D750 coupled with 16-35mm f4 @ 16mm Aperture: f/14 and Shutter Speed: 4s
ISO 100
out front – Hoya CPL, Lee Graduated 0.9x Filter, rainbow and lots of rain

https://blog.avernus.com.au/the-spirit-of-the-bundjalung-people/

Lower Kelly's Falls

view large (c'mon I know ya want too and I promise its not a dodgy low res version)

I am sure I could come back here in 12 months and it would be a completely different setup with logs and branches moved about by the water flow.

What is amazing is the sheer size of the tree trunks that are strewn around the falls, this one, which I have dubbed the divider is quite large but probably 1/4 the size on one just off to the right of this shot. How they get there is pretty amazing too, there must need to be alot of water coming over the falls to push them around.

Kellys Falls reminds me very much of the National Falls in the Royal National Park, which is not all that surprising since that particular falls is only 30 mins drive up the coast from here, but they have very similar rock formations and are similar heights, (based on my super accurate thumb in the air kind of measurement 😉 )

The trek in is pretty short, however there is a bit of rock climbing required and the mandatory trust your life to a dodgy bit of rope that someone has tied to a sapling which is clutching to life in the muddy soil 🙂 however it is well worth it and there is actually two falls in close proximity so more bang for your buck (or climb)

One of the hard things about shooting waterfalls is actually 1) getting to the place where you want to compose your shot and 2) getting your darn tripod to be in the right position based on all the freaking uneven rockage. There is also the slippery-ass factor too, thats just thrown in there to test your nerves, joints and bones 😉

I wanted this log in a slightly different possie, however the final composition was dictated by the rocks, minimisation of the possibility of ending up in that murky-ass water and how long I could sit with a pointy-ass rock trying to split me in half ;-(
It is a blended image in that I took three frames of different exposures to capture the highlights up top but also maintain the shadow detail in the rocks, water and trees.

Exif love:
3 images manually blended together in +Adobe Photoshop :
D750 coupled with 16-35mm f4 @ 16mm Aperture: f/14 and Shutter Speed: 13s (normal exposure), 1.6s (highlights, just that bright bit up top) and 30s (shadows, for those dark areas in the trees, rocks and water)
ISO 100
out front – Hoya CPL

https://blog.avernus.com.au/lower-kellys-falls/