but also don't forget those who are currently serving
These good lads in the Navy always look so very enthusiastic to be in the marches 😉

but also don't forget those who are currently serving
These good lads in the Navy always look so very enthusiastic to be in the marches 😉

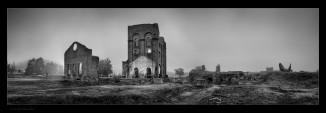
This place gives me a tiny insight into what some of the eastern block countries have – I follow a number of photographers from over that way and some of the amazing places and abandoned buildings they have over there make or stunning photography. But, like the saying goes, you gotta make do with what you have, so here you have it Blast Park, the scene of the old smelter works. The bit on the right is the remains of the crucible, now thats a sight to see!
+Tom Testone recently posted a image from a few years back and it got me into the nostalgia side of things and I had a quick squiz at a few images from this time last year, this is one such image , which, like 80% of my images, sits patiently waiting to be given some love 😉 geez they are well behaved 🙂
4 Shot Panorama, stitched in +Adobe Photoshop and corrected with Adaptive Wide angle, since there was some freaky distortions happening here 🙂
Exif data, 'cause i now ya hanging for it 🙂
Nikon D7000 coupled with the 11-16mm f2.8 (damn i love that lens) @ 15mm, aperture f/8
Shutter speed 8s
ISO 100
EV: 0
watching
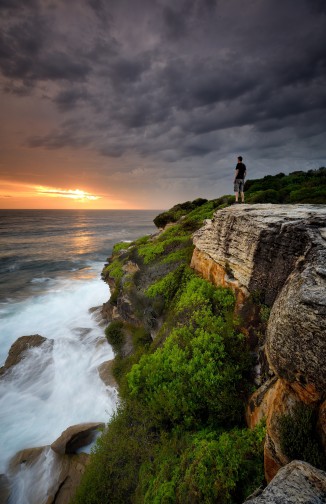
As Sydney comes out the other end of some wicked weather, it seems only appropriate to post this image.
Here it is, the dawn of the end of the wild weather. I hope ya'all made it through OK – my thoughts go out to the families of those who lost their lives in the floods/storms.
Exif love:
D750 (yeah i know the embedded exif says D610 🙂 ) coupled with 16-35mm f4 @ 16mm Aperture: f/13 and Shutter Speed: 1.6s
ISO 400
out front – Hoya CPL and Lee Graduated Filter 0.9x
running to where? why? and why away? not back ?
whilst running is probably the natural thing our bodies were made for i find it rather … lets say.. onerous. A swim though is much more enjoyable, don't need to worry about boring things like staying upright or balance 🙂
3 shot panorama (or was it 4?)
Exif/setup:
D750 coupled with 85mm f1.4 @ 85mm Aperture: f/7.1 and Shutter Speed: 1/400s
EV:-0.3
ISO 400

Tickles (well what I reckon what going on in her head):
"Dad you should really try this toothbrush man… its so much more awesome than my dinky little one….. really dad stop taking photos and try it 🙂 mum won't know a thing.. she only uses it to paint stuff on her face you know?"
for the record, mum does not like having her 'brushes' used as toothbrushes 🙁

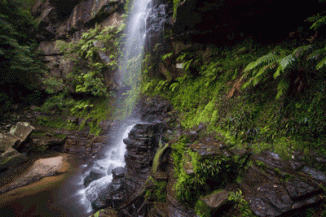
hidden deep in the gulley away from the blue sky, a trickle quietly creeps over the rocks
Its pretty cool when you can get to 30 second shutter speeds without filters and its 10am in the morning. Mount Wilson is well known for a few serious canyoning routes, this is not one of them 😉 however you can certainly see how the area is well suited to it. The walk down is pretty mild and access to the various little falls is easy and there is plenty to see and photograph, but what I did like was the sweet greenness of the rocks contrasting with the deep black of the rocks – fav combo right there so i forgive the falls for being only a trickle.
single frame, no gimmicks 😉 just alot of green rough balls..
Exif love:
D750 (yeah i know the embedded exif says D610 🙂 ) coupled with 16-35mm f4 @ 16mm Aperture: f/16 and Shutter Speed: 30s
ISO 100
out front – Hoya CPL

Mount Wilson, NSW
I remember my mum saying, why would you want to visit there, there is barely native tree in sight 😉 or words to that effect anyway. My mum is a pretty staunch supporter of native trees etc.
So, queue Mount Wilson from the left, this place is like a colour explosion against the dull grey aussie bush backdrop – apparently as history has it.. the early settlers of the area were pretty wealthy people looking for a retreat location, they of course wanted a bit of home (England) and hence planted all the usual oaks and elms and stuff (thats my technical term ’cause i have no idea really:) ) and its pretty well stayed that way since then 😉 pretty wealthy people and lots of retreats :)…
But I suppose its now quite the tourist location and of course the much loved destination for many a photographer, from the smartphone wielding high heeled ladies to the tubby 200mm f2.8 bashing pros 🙂 that may be a little stereotypical but…
I am not overly convinced that this experience, for me, was worth the stupid oclock wake up and mind numbingly boring drive up and back (the apple pie and coffee at Bilpin was pretty nice though) but in the interest of actually producing a image, this is probably one of my favorites from the morning. The early start means you can stand on the road for quite some time snapping away before getting run over 🙂 In fairness though the colour has not fully developed here and the recent rain has smashed alot of the leaves from the tree and muted the colours a bit. I was just expecting to drive down and have my socks blown off by the wondrous colour 😉
So, you choose your path and go on, view it large 🙂
This is a 5 shot panorama, with each frame bracketed, to be honest the bracketing is a bit of a waste of time here, the extra effort required to process it outweighs the increased dynamic range for only a very small (insignificant part) of the image.
Exif love:
5 shot panorama,
D750 coupled with 24-70mm f2.8 @ 31mm Aperture: f/10 and Shutter Speed: 1.6s (normal exposure), 1/5s (highlights) and 13s (shadows)
ISO 100
out front – Hoya CPL

I would call it a waterfall, but its more like a trickle.
Waterfall Reserve at the end of Waterfall rd on the Waterfall loop walk, i suppose I better take a picture of the waterfall.
3 frames stitched together in +Adobe Photoshop
Exif love:
D750 coupled with 16-35mm f4 @ 29mm Aperture: f/14 and Shutter Speed: 25s
ISO 100
out front – Hoya CPL and lots of mud.

Kellys Falls, number 2
The misty spray was just enough to be painful on keeping the filter clean but not enough give that misty look in the scene… 🙁
I love panoramic shots of waterfalls, they can add such a different perspective to a scene and to be honest, composition wise they are much easy than a single 6×4 frame 🙂
3 frames stitched together in +Adobe Photoshop
Exif love:
D750 coupled with 16-35mm f4 @ 24mm Aperture: f/14 and Shutter Speed: 5s
ISO 100
out front – Hoya CPL and lots of darn water drops
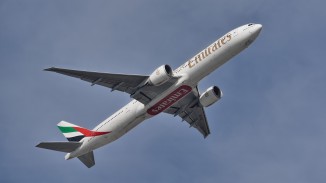
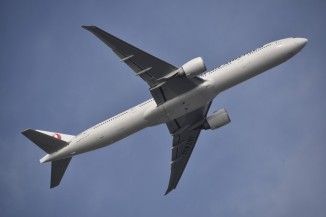
777-300ER
A regular visitor on a saturday morning, also every other morning too i suppose.
Exif love:
D750 coupled with Nikkor 300mm f/4 AFS and 1.4 TC-14EII @ 420mm Aperture: f/8 and Shutter Speed: 1/2500s
ISO 200
EV: -0.3
out front – plane
I typically dislike doing comparisons between stuff, there are usually plenty of better sources out there and others with more interest in doing it then me 🙂
However… after recently borrowing the Sigma 50-500mm from Rodney Campbell and noting that it was pretty sharp for a super zoom, I thought i should really see how this compares to my 300mm f4. The 300mm f4 is a great lens in my opinion, I have had it for years now and the sharpness and more importantly the contrast and colour rendition is really nice, especially for a lens which is not at the top of nikons price range 😉
The Sigma 50-500 is a very nice lens and the large range, stabilisation and sharpness makes it very versatile. It however weighs more than a small tank. I really liked the shots at 50 mm too 🙂
In a nutshell, you really can’t compare the two but…for me and my purposes (in most cases) I would take the 300mm (with a TC where needed) over the 50-500mm. The main reasons for this are (in no particular order)
1) sharpness across the frame
2) colour/contrast
3) weight.
I really think the biggest con to the Sigma is the fact that its big and heavy, which means you cannot use for alot of things that I would, for shoots where your on a tripod and not moving around much then its fine, take a airshow for example, I would use it there without a doubt. The zoom range and the stabilisation become very important pros and more chance of getting more better shots than using the 300mm.
However for a walk around shoot the 300mm is a much better option, light, sharp and somewhat more discreet 🙂
I occasionally take shots of planes, hence I thought this would be a good subject to compare the two 🙂
Now this is not a perfect comparison and there are a few variables in there, so if you want scientific standard comparisons head over to photozone or some other more reputable site 🙂
The two shots are from two different days (variable #1), however conditions were fairly similar and the air was pretty clear, trust me, I know I am here just about every day 🙂 . The settings (variable #2) are not exactly the same, ie shutter speed and a ISO (160 vs 200) but these should not have a significant effect on the overall outcome.
But what is the same.. now this is where it gets important right 🙂 both aircraft are Boeing 777’s and the composition is pretty well the same 🙂 admittingly one is Emirates and the other Japan Airlines..
The image/camera settings are at the bottom.
Both images (and 100% crops) are edited in PS and the Sigma one was tweaked to get the right exposure, it was a about 2/3rds of a stop under. No sharpening added, saved as high quality jpegs.
So, at f8 both lens are stopped down and should be getting pretty close to the optimal range, if things look pear shaped here than its bad 🙂 The lower shutter speed on the sigma has not introduced any motion blur, as expected its well within the handhold range, even more so with OS/VR.
I would expect that the 300mm without the TC would only be a improvement here, but I used the TC mainly since the 400mm range is a more used one for me based on history.
The results? the sigma is pretty damn sharp for what it is, a superzoom, but it is noticeably less sharp away from the centre but still pretty acceptable overall. The nikkor 300mm with the 1.4TC is definitely sharper across the whole frame, however at the centre its probably only marginally sharper.
The colour rendition is pretty hard to compare with just these two images, the best I can say is given my limited use of the 50-500 I found I still prefer the colour/contrast of the nikkor.
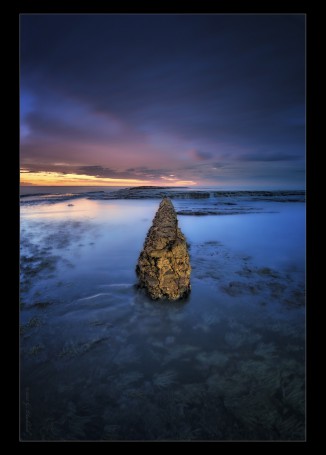
When you turn up sunrise and its nearly an hour before the big S breaches the horizon, things can be a tad on the dark side, however, it is this time, also known as nautical sunrise, where you can get some stunning deep colour. Capturing it is easy, its getting all the stuff around it to be bright enough to even show up….
One solution is to take along a torch, which if you have any sense you would have cause its damn dark and you would stumbling around in the dark without one 🙂 anyway you can take this torch and provide a little artifical illumination, its a bit of trial and error but the results can be OK… mostly I have found it pretty hit and miss, and in this case.. well things got a bit too cooked, hence the title compete the artificial rock takes over the image and just about drowns out the for sunrise 🙂
Another point to make about using your torch to light paint, and I bang on about this all the time, is to make sure you use it nice and low to the ground to get some texture, but also more importantly choose where you want the light to come from – don't do what I did in this case and be lazy and just stand next to camera and halfheartedly wave it around 🙂 pick a spot well off to the side and give it a nice flow. Apply more light further away from the camera and less closer to the camera since the closer bit will light up much quicker.. you know light fall off as you get away from the camera.
Anyway, there you have it.. compete.
single frame, LED torch illuminating the rock fence from the right hand side, the other reason for the lazy man option was it was dark and I could not see much and.. there was some big potholes there .. anyways..thats the excuse I am sticking too 🙂
Exif love:
D750 coupled with 16-35mm f4 @ 16mm Aperture: f/13 and Shutter Speed: 97.8s
ISO 100
out front – Hoya CPL, Lee Graduated 0.9 Filter
here ya go, the making of the selfie, in timelapse goodness.
by patient its 2 mb 🙂
original shot here :
https://blog.avernus.com.au/waterfall-selfie/
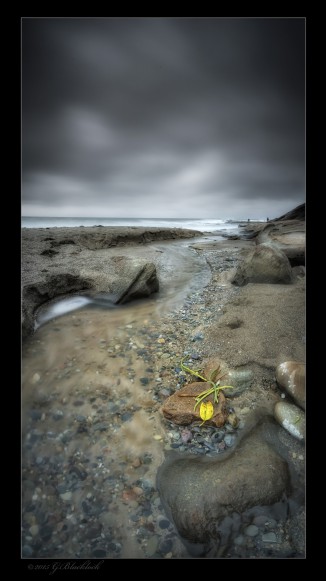
This little freshwater creek running into the ocean was in the process of excavating the dunes to straight line, it has been thwarted by some solid rocks which means it slides down a slippery 'S' into the incoming surf. This however, works in my advantage, the S curve creates some nice lines and just screams 'vertical pano' ok its probably a good chance I am the only one hearing that voice 😉
I had quite some time to really set this up and ensure it worked out, typically vertical panos using a wide angle lens (at 16mmm) without a proper pano rig can be a distortion nightmare.
I achieved two things with this shot, 1) the increased vertical FOV and 2) maintained depth of field thru the image, this was somewhat important since that rock in the foreground, the one in front of the one with the leaves on it is only 50 odd centimeters away, or 3ft for the imperial people. I was sitting on a rock just behind teh tripod which was at its lowest level.
I took 3 portrait orientation shots here, in each one the focus point was changed to ensure the maximum depth of field was achieved, the first image (bottom frame) focused on that rock with the leaves, the second image (middle frame) focused on the rock half up picture on the right and the final image (top frame) focused on the pool.
Exif love:
D750 coupled with 16-35mm f4 @ 16mm Aperture: f/18 and Shutter Speed: 30s (all shots)
ISO 100
out front – Hoya CPL and Lee Graduated 0.9x Filter