Maroubra Sunrise or more accurately ‘cloud rise’

Some days one must make the best of what is provided, cannot let a little bit of rain and clouds dampen the morning out, quite to the contrary, some of me best images have been made on cloudy, sunless days. Its all about finding that shot admist the conditions and environment that is presented.

Maroubra, more correctly Mahon’s Pool and the surrounding rocks do have some nice compositions and opportunities for some good water based shots, however, having been there twice now, it does feel a bit limited, maybe I am just used to be able to clamber as far along the coast as I can go to track down something interestign or different, maybe its just me stuck in a mindset with this location!

Any any case it was a nice morning out!

Its always interestign to check out how one has changed, in a photographic sense, this is best achieved by taking alook at the images form the last session last year – less than 10 months ago. I actually reckon both sets have their merits, but am leaning towards last years effort!

Customising Gallery3

More of a record of what I have done then anything else!

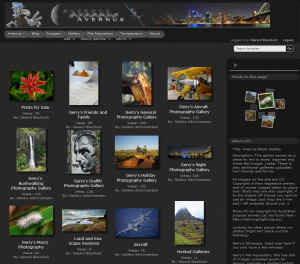
Theme installed; Gerrys modified version of Dark Canvas Theme

Why I modded it? I wanted drop shadows around my albums, no crappy icons, fluid width and my own CSS header.

The great thing about Gallery3 is the way you mod the theme and how things look, the only files you have to touch (well for me anyway) are;

1) /dark_canvas/views/page.html.php

2)/dark_canvas/css/screen.css

So, onto the mods

Drop shadows;

Insert the following into the top of /dark_canvas/views/page.html.php

<style>
img.g-thumbnail, img.g-resize{
border:0;
-moz-box-shadow: 5px 5px 5px #111;
-webkit-box-shadow: 5px 5px 5px #111;
box-shadow: 5px 5px 5px #111;
}
</style>

and

<script type=”text/javascript”> $(document).ready(function() { $(“img.g-thumbnail, img.g-resize”).css({‘behavior’: ‘url(/PIE.htc)’}); }) </script>

and get hold of PIE to hopefully sort out some the older IE issues!

http://css3pie.com/

Just extract this into the root gallery3 directory

Icons;

just delete them from the images directory, quick and dirty!

Fluid width;

Change

<div id=”doc4″ class=”yui-t5 g-view”>

which gives you a fixed 974px width
to

<div id=”doc3″ class=”yui-t5 g-view”>

which gives you 100% width!

thats the easy bit, now to jump into the CSS and play with teh containers to get the content to not be fixed to a set number of columns!

I have tweaked a few little things like heading text size, but forgot to note where I changed stuff, normally I try and comment when I change stuff so when I drop by in 6months time I know whats changed!

This is what I ended up with

/*gerry*/
#g-content {
padding-left: 20px;
position: relative;
width: 95%
}

/*gerry*/
#g-sidebar {
padding: 10px 10px;
float: left;
width: 220px;

This makes the gallery a true fluid width, just adjust the number of items on the page thru the theme options and your good to go!

Custom header and footer;

This is pretty easy, gallery3 gives a place to include html for the header and footer, however you have to be careful since it strips away CSS, this makes things a bit interesting when you want your CSS header!

All I did was modify the

/dark_canvas/views/page.html.php

to include my CSS code and hey it worked! you may also need the html_purifier module which helps – not sure how or why.

probably a better way would be to include your CSS in the screen.css file!

this is my code for the CSS stuff;

<style type=”text/css”>

.gbutton, .gbutton:visited {
background: #222;
display: inline-block;
padding: 3px 10px 3px;
color: #ddd;
text-decoration: none;
-moz-border-radius: 4px;
-webkit-border-radius: 4px;
-moz-box-shadow: 2px 3px 8px rgba(255,255,255,0.50);
-webkit-box-shadow: 2px 3px 8px rgba(255,255,255,0.50);
text-shadow: 0 -1px 1px rgba(0,0,0,0.25);
border-bottom: 1px solid rgba(0,0,0,0.25);
position: relative;
cursor: pointer;
}

.gbutton:hover                            { background-color: #111; color: #fff; }
.gbutton:active                            { top: 1px; }
.small.gbutton, .small.gbutton:visited             { font-size: 10px; padding: ; }
.gbutton, .gbutton:visited,
.medium.gbutton, .medium.gbutton:visited         { font-size: 13px; font-weight: normal; line-height: 1; text-shadow: 0 -1px 1px rgba(0,0,0,0.25); }
.grey.gbutton, .blue.gbutton:visited        { background-color: #505050 ; }
.grey.gbutton:hover                            { background-color: #707070; }

</style>

and my header text, which is set through -> Appearance ->Theme Options

<!DOCTYPE html PUBLIC “-//W3C//DTD XHTML 1.0 Transitional//EN” “http://www.w3.org/TR/xhtml1/DTD/xhtml1-transitional.dtd”>
<html >
<head>

</head>

<body>

<body bgcolor=”#222222″><img name=”galleryheader” src=”http://www.avernus.com.au/gallery-header_V4.gif” width=”850″ height=”80″ border=”0″ id=”galleryheader” alt=”” /><br />
<br />
<div align=”left”><a href=’http://www.avernus.com.au/’ class=’small grey gbutton’>Avernus »</a>
<a href=’https://blog.avernus.com.au/’ class=’small grey gbutton’>Blog</a>
<a href=’http://gerry.avernus.com.au/avernus/IS/’ class=’small grey gbutton’>Imagery</a>
<a href=’http://gallery.avernus.com.au/’ class=’small grey gbutton’>Gallery</a>
<a href=’http://gerry.avernus.com.au/slide/’ class=’small grey gbutton’>File Repository</a>
<a href=’http://www.avernus.com.au/avernus/pages/hardware/temperature/temperature.htm’ class=’small grey gbutton’>Temperature</a>
<a href=’http://www.avernus.com.au/avernus/pages/misc/about-avernus.htm’ class=’small grey gbutton’>About</a>
</div>
<br />
</body>
</html>

and footer;

<html> <head>    <!– function MM_openBrWindow(theURL,winName,features) { //v2.0   window.open(theURL,winName,features); } //–>  </head>  <body link=”#CCCCCC” vlink=”#CCCCCC” alink=”#CCCCCC”> <div align=”center”><font size=”1″ color=”#999999″>© Copyright 2001-2011, www.avernus.com.au ,<a href=”http://www.avernus.com.au/avernus/pages/misc/copyright.htm” target=”_self” /avernus/pages/misc/copyright.htm’,”,’scrollbars=yes,width=700,height=800′)”>[View Copyright and Terms of Use]</a><br>   Pages maintained by: <a href=”mailto:webmaster@avernus.com.au”><i>Gerard Blacklock</i> </a> Last Modified –   <!– #BeginDate format:fcAm1m –>Thursday, January 6, 2011  23:04<!– #EndDate –>   </font></div> </body> </html>

Getting Sharp images out of Gallery3

The default settings and graphic package for Gallery3 will make any real photographer shudder at the look of the images, by default they are way too compressed and pixelated, a couple of things to get them looking better, and for me it was trial and error until I was happy with the quality and file sizes!

Firstly get hold of ImageMagick version 6.xx and get it installed! its a better processor.

Secondly, get into the advanced settings tab and tweak the following settings, these values are what I have ended up with – after about 5 iterations!

gallery     image_quality     95
gallery     image_sharpen     16

Gallery 3 – the revolution is here!

Alright, so to try and get myself motivated to get more of my images back on a gallery I thought I would check out the latest offerings from Menatlo Gallery. Gallery3 has been in the pipelines for quite some time and there was a significant focus shift in the way the software was to be used, in a nutshell and looking in hindsight I think that was primarily to reduce the complexity of teh software and move towards a simple clean interface which concentrated more on easy quick photo management.

I was dubious at the start, however Gallery1 and Gallery2 were a bit painful in managing images, moving things around and other little quirks made me neglect my gallery.

A couple of issues came to mind when thinking about upgrading;

1) I had a nicely modified theme which I liked the look of this would not work with gallery3

2) How would the import process go? with 5k images this could be a breaking point.

3) I wanted to move the address from somewhere deep in the server to a nice easy possie like /gallery with a subdomain of gallery.avernus.com.au this could throw a spanner in the works.

4) I had a multi gallery site to confuse issues as well!

Anyway, installed the latest release of Gallery3 which was first non beta version, talk about great timing huh! The install was very easy and i put it in the new location with teh new domain name. The whole interface and software reminds me very much of wordpress, it now has a dashboard and a sidebar with ‘widgets’ i guess you could call them that! And has modules, which were there before in gallery2.

So first thing was first get the module called ‘gallery2 import’  thats a good place to start, ran that baby for quite a few hours and it imported all albums and images flawlessly, took a while but it did it! It also left the old gallery2 install in place – great if it all went pear shaped.

Themes were always gonna be an issue, there is only a few themes out there, I realised I was gonna have to tweak them to get what I want – check the next entry for details about this.

Getting Sharp Images from Gallery3

and

Customising Gallery3

In terms of modules – I have steadily added to the module collection and I think I am pretty close to what I want now;

Akismet    –     Filter comments through the Akismet web service to detect and eliminate spam (http://akismet.com). You’ll need a WordPress.com API key to use it.
Shopping Basket     –     Provides a simple shopping basket and checkout with paypal integration
Carousel     –     Add a vertical carousel for recent & popular items in the sidebar.
Comments    –     Allows users and guests to leave comments on photos and albums.
Digibug   –      Digibug Photo Printing Module
Exif Data     –     Extract Exif data and display it on photo pages.

Read More →

Gerry’s Kalendarium

Well its been years in the making, more to the point, its taken me years to get off my rear and actually spend the time and effort to generate it.

I have always wanted to produce a calendar, however it did have to be something more than the typical Red Bubble ones, something more than the stock standard black lined monotony, I wanted something individual, something designed by me, something with colour, the list goes on..

I just could not do it the easy way now could I?!

I also did want to put up with the absolute purgery of software out there to lock you into printing with them with their crusty designs.

So what did I come up with? well after 3 proofs (at some crazy price I bet) I came up with something that seemed to look ok and pass my quality assurance levels, which believe it or not are not that high! There was a few late nights and a few trips to the local A1 Printers (Enmore) – theres a plug for ya’s – with the tackers in tow but I do finally present the preview of the ‘Blacklock Kalendarium’.

Oh, what that I hear you say? its nearly Feburary already? yeah yeah, no point in being on time eh.

Bicycle Tyre Liner vs Steel/Brass Tack

So, after 3 successive flat tyres whilst belting along the freeway on the pushie the I deemed it necessary to investigate some better options to protect those little tubes full of that glorious air that makes for a more comfortable and speedy arival to ones destination 🙂

Tyre liners, these are bascially strips of plastic/rubber that sit between the tyre and the inner tube, relatively cheap, 30 odd dollars for two and are pretty easy to fit, they seem to have very little, if any, detrimental effect to the performance of the inner tube and tyre. They are referred to as STOP Flats 2 by Brown, made in the USA.

So for many a month these little strips performed perfectly and I was flat tyre free! Until one day when I noticed a slow leak in the front tyre, I left this go for a few weeks since it did not really bother me too much, however shortly before the Creat Victorian Bike Ride I figured it wise to investiage the cause of the slow leak.

After pulling the tyre off and tracking down the hole in the inner tube I found teh culprit, a small tack about 5mm in length, this has lodged itself in the tyre and was just long enough to penetrate the tough strip! Crazy stuff ehh..I am still impressed by the perform of these strips, I mean at the end of the day, riding over a nail or tack is gonna cause any tyre problems unless its got chainmail or something! That said, I reckon I might take them up on their offer of a free inner tube if you do get a puncture!

I reckon that set of images pretty well sums up the issue!

2010 GVBR (Great Victorian Bike Ride) Day 8

Day Eight – Yea to Eildon – Saturday 04 December

Official Distance  64km

Gerry’s Cateye Statistics:

Riding Time: 3:22hrs

Distance: 68.9 kms

Average Speed: 20.4 km/h

maximum Speed 54.9 km/h

Calories Burnt: 1134.0

ODO: 579.5

Some big hills and some serious downhills too, this was starting to make day 2 look like a walk in the park! Some big stacks on this day too, makes one alittle more cautious on the down hills after seeing the SES go in ahead and the B412 rescue chopper beat over head!

Weather: it looked like it was gonna rain but did not, cloudy and cool, nice for riding!

The Good Oil Newsletter:

Day 8 A3 _Saturday night_

Day 8 A4 Insert _Saturday night_

2010 GVBR (Great Victorian Bike Ride) Day 7

Day Seven – Seymour to Yea – Friday 03 December

Official Distance  85km

Gerry’s Cateye Statistics:

Riding Time: 4:20hrs

Distance: 91.93 kms

Average Speed: 21.1 km/h

maximum Speed 63.7km/h

Calories Burnt: 1573.6

ODO: 510.3

This day had some pretty hard hills, but I reckon I do better at the hills than the flats!

Weather: Bloody Hail at the last rest stop, what the hell is with the weather in Victoria at the moment..craziness!

The Good Oil Newsletter:

Day 7 A3 _Friday night_

Day 7 A4 Insert _Friday night_


2010 GVBR (Great Victorian Bike Ride) Day 6

Day Six – Nagambie to Seymour – Thursday 02 December

Official Distance  101km

Gerry’s Cateye Statistics:

Riding Time: 4:33hrs

Distance: 105.45 kms

Average Speed: 23.1km/h

maximum Speed 46.2km/h

Calories Burnt: 1802.1

ODO: 418.4

Welcome to the world of pain!, actually it was not too bad and my average speed reflects this.

Weather: Great early on, nice and cool, with a little cloud, but after the lunch stop on teh final leg down into Seymour, past the Pupa.. something army training base it absolutely shat down…, everything was wet!

The Good Oil Newsletter:

Day 6 A3 _Thursday night_

Day 6 A4 Insert _Thursday night_


2010 GVBR (Great Victorian Bike Ride) Day 4

Day Four – Murchison to Nagambie – Tuesday 30 November

Official Distance  69km

Gerry’s Cateye Statistics:

Riding Time: 3:24hrs

Distance: 73.01 kms

Average Speed: 21.4km/h

maximum Speed 34.8km/h

Calories Burnt: 1094.5

ODO: 312.9

Pretty much the same as the last day, almost the same time and speeds, this day I readjusted the bike seat, put it up by about another 1.5″ in total, this made heaps of difference to my RHS knee, the hip was a bit sore still, but thats to be expected from the prang the week before!

This was a nice ride, pretty flat had some nice lunch/morning tea stops, checked out the river and weir…

The campsite at Nagambie was chaos, everyone trying to get a good spot for the two nights there!

Weather: thats a good question, lol, nah same as teh day before, a bit of sunshine towards the later part of teh day but some nice cloud to keep things cool.

The Good Oil Newsletter:

DAY 4 2010 – 181110 MC


2010 GVBR (Great Victorian Bike Ride) Day 3

Day Three – Euroa to Murchison – Monday 29 November

Official Distance 68km

Gerry’s Cateye Statistics:

Riding Time: 3:20hrs

Distance: 72.33 kms

Avergae Speed: 21.6km/h

maximum Speed 34.8km/h

Calories Burnt: 1122.0

ODO: 239.5

This day was pretty straight forward, there was a nice little tailwind and it was all pretty darn flat. The old RHS knee as starting to feel it though.

Weather: Thin layer of overcast cloud, enough to keep things cool but trick you into get fried!

The Good Oil Newsletter:

DAY 3 2010 – 181110 MC